Appearance
Submitting your application to review
Once you have thoroughly tested your application and confirmed its readiness for submission, you can proceed to the submission flow. This will allow you to then mark your application as live and make it accessible to the Vim network or your own network. Before it goes live, our team will review your submission to ensure it meets security standards and offers an great end user experience.
Submission for review will lock changes to this application version throughout the duration of the review. You can always duplicate the locked in review version to create a new application version.
The submission flow has four parts:
Review information
The details in this section are internal and solely shared with the Vim review team as part of the review process.
As part of the application review process, it is important for developers to provide detailed information to ensure their app is secure, functional, and integrated properly with the Vim platform. Here’s why each section of the form is necessary:
- Application information: This overview helps the review team understand the core use cases and functionality of your application. It ensures that the app aligns with Vim’s ecosystem and meets user needs.
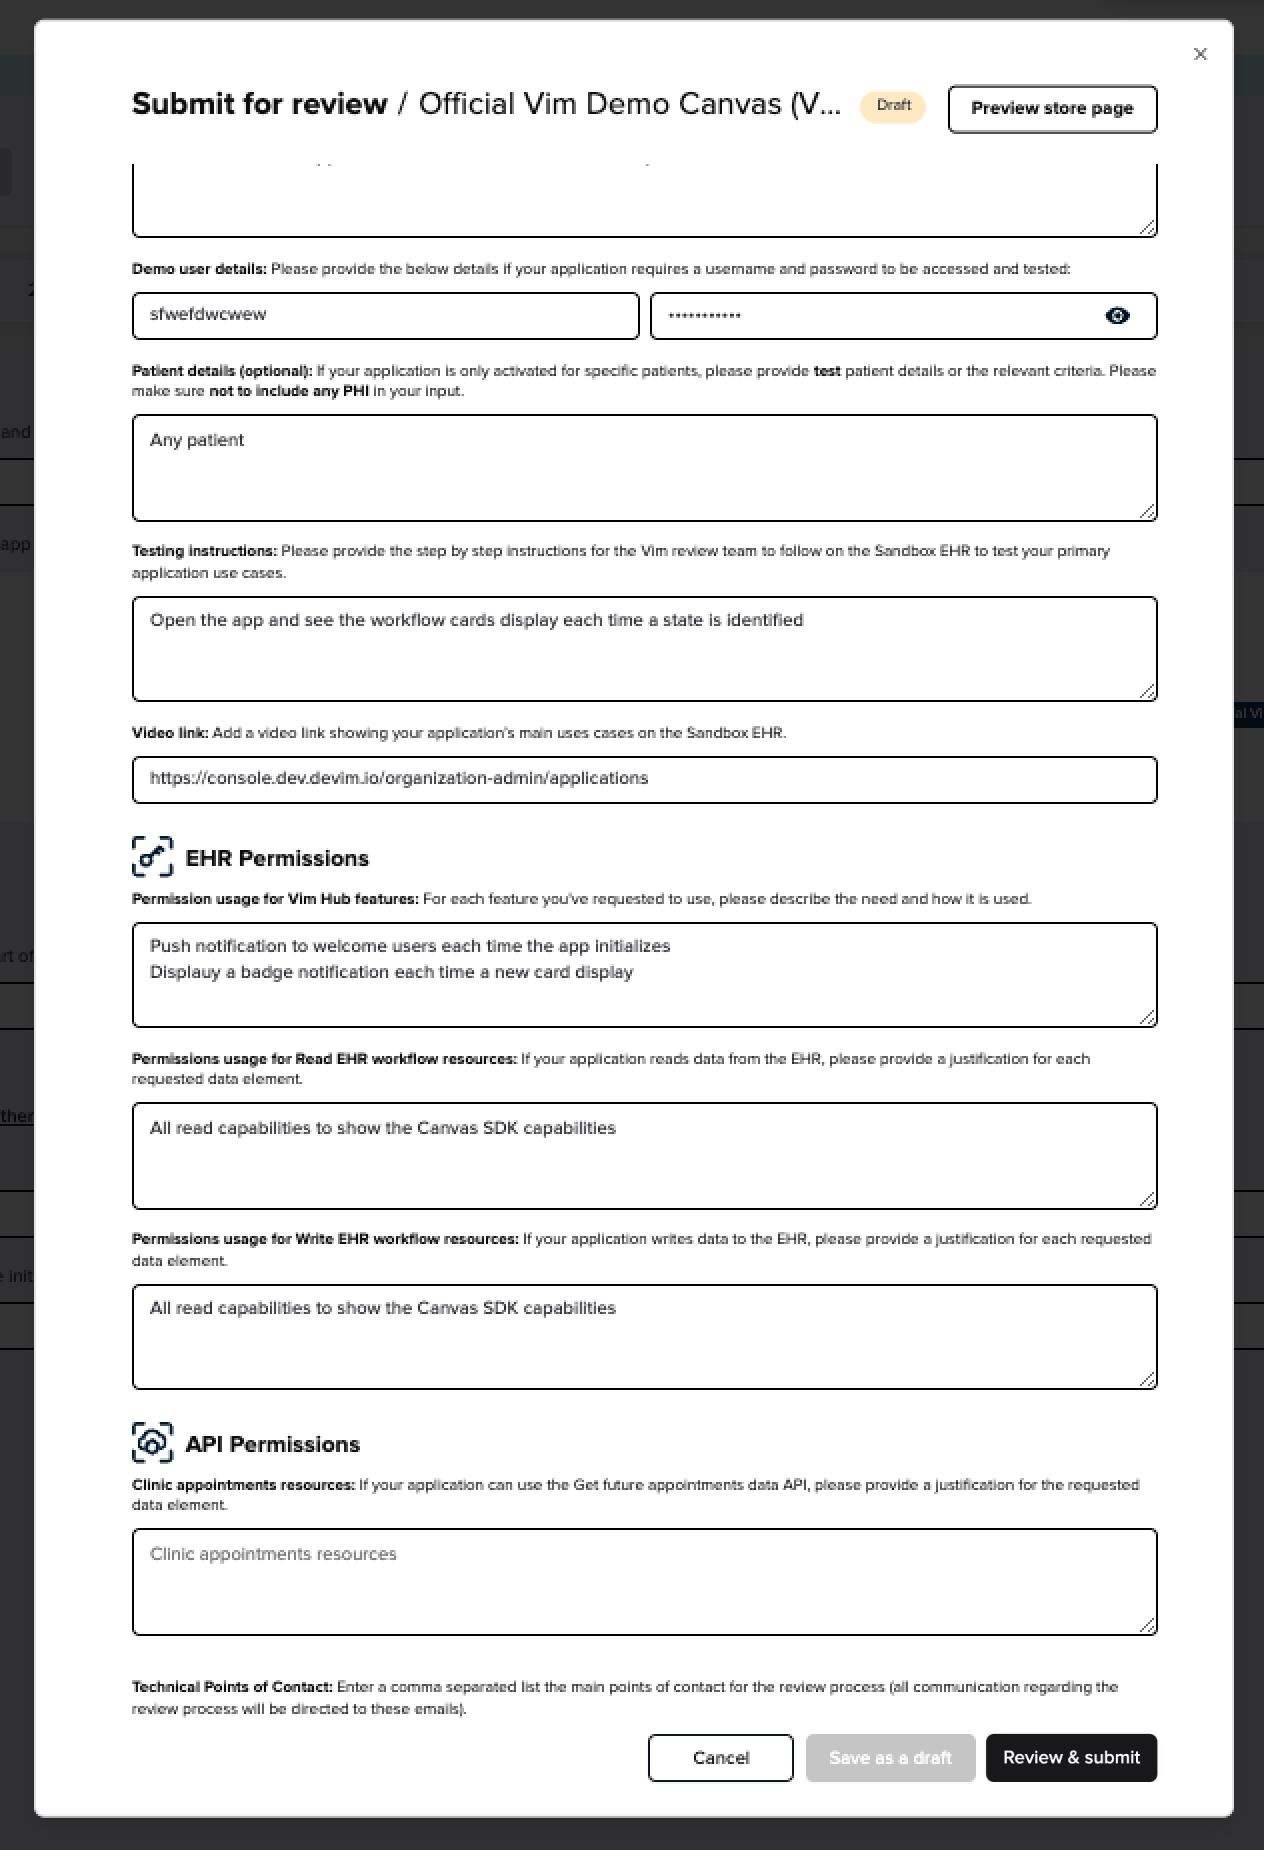
- Demo user details: If your app requires authentication, providing demo user credentials allows the review team to access and test your app as an authenticated user. This is crucial for validating the app's functionality under real-world scenarios.
a. Provide the user username in the Username field.
b. Provide the user password in the Password field. - Patient details (Optional): If your app targets specific patient cases, please share relevant patient profiles to assist the Vim review team. If the patient is in your Vim Sandbox EHR, you can provide their first and last names, but do not share real PHI data.
- Testing instructions: Provide clear step by step instructions to follow to help the review team simulate your app's workflows in the Sandbox EHR environment. This ensures thorough testing of key features, making sure your app performs as expected across different scenarios.
- Video link: A video demonstrating your app’s use cases helps the review team understand your application’s functionalities and workflows quickly, allowing them to visualize the users interaction.
- Permissions usage for Vim Hub and EHR Resources: Detailing the features and data elements your app interacts with ensures that it’s accessing only the necessary permissions. This helps protect user data and ensures your app is compliant with Vim’s security and privacy standards.
- API Permissions: Providing a justification for fetching future clinic appointments helps ensure proper handling of clinic and user data, and maintains compliance with Vim's security and privacy standards. Appointments public API
- Technical point of contact: Provide a support dedicated email for efficient communication throughout the review process. It ensures that any questions or issues raised during the review are addressed promptly.
By providing this information, you’re helping the review team thoroughly assess your app's performance, security, and compliance. This step is crucial to ensure a smooth launch and a high-quality experience for end users.
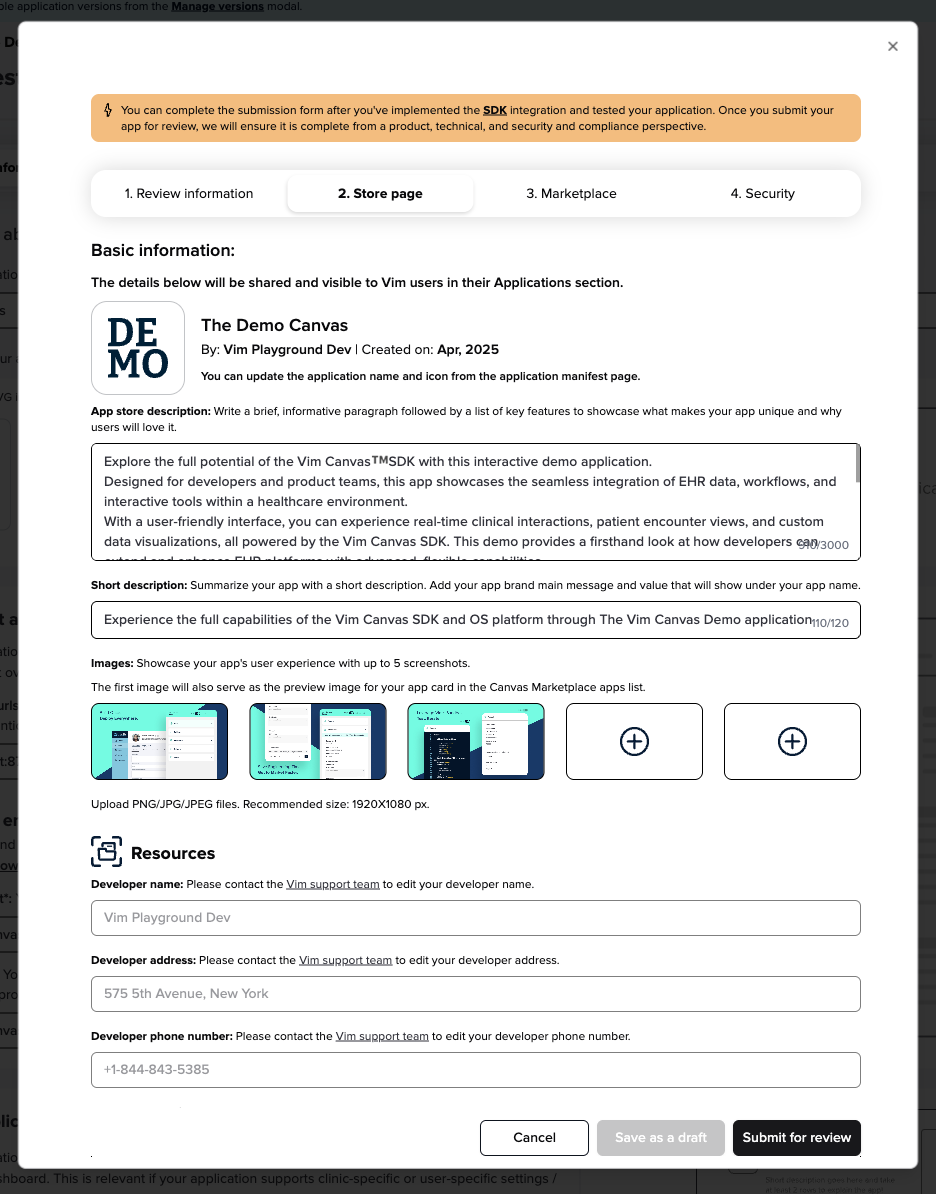
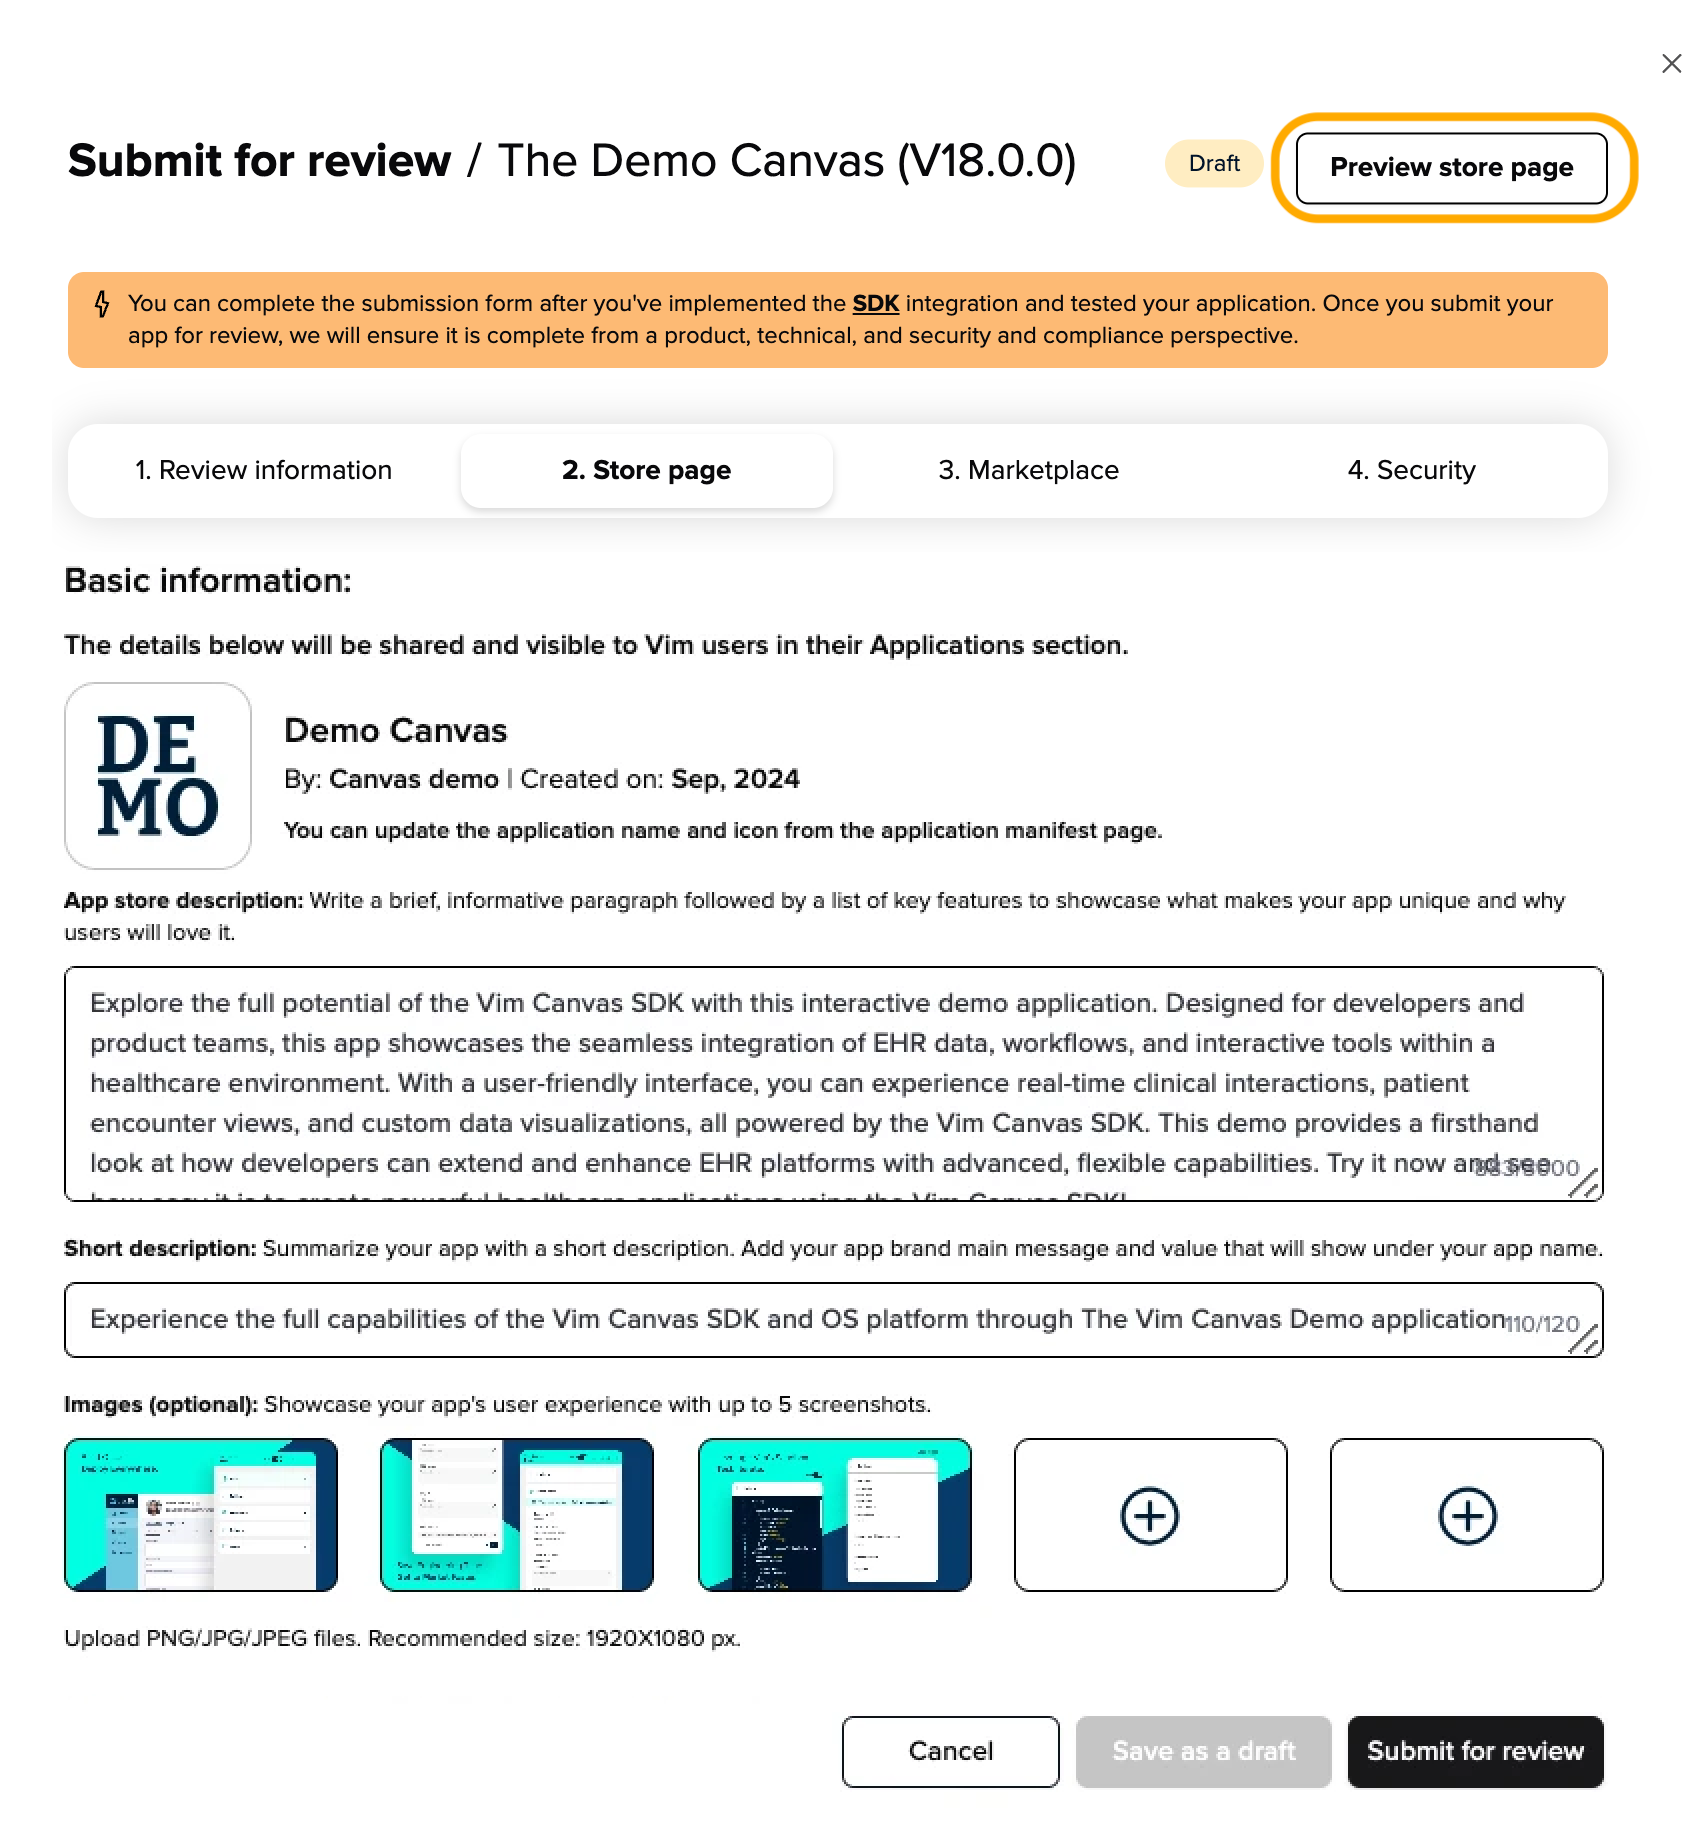
Store page
You can see an example of the Demo Canvas app store listing page here as a reference.
1. App store description (up to 3000 characters):
A brief, informative paragraph followed by key features to highlight what makes your app unique and valuable. The app store description should give potential users a clear understanding of your app’s value and functionality to attract users and set expectations.
💡App description formatting guide
Use this guide to write clear, engaging app descriptions using plain text with emojis and symbols — since currently the text box does not support rich text or markdown.
General tips
- Keep it short and scannable.
- Use emojis or symbols to break up content.
- Group info into logical sections (Overview, Features, Audience, CTA).
- Use symbols like ✓, •, →, or ➤ to highlight points.
Formatting options Recommended
✅ Bullet points & lists:
markdown
✓ Feature 1
✓ Feature 2
• Clean UI
• Fast performance
→ Works with all EHRs
🔠 Section headers:
markdown
🔍 Overview:
📦 Features:
👥 Who it's for:
🚀 Why it matters:
🎨 Emojis for visual flair:
markdown
🔒 Secure data
📱 Mobile-ready
🧩 Seamless integrations
🧩 Tables (1-liner style):
markdown
Features:           Availability:
✓ EHR Sync          ✔ All platforms
✓ Note-taking       ✔ Mobile + Desktop
✓ Scheduling        ✔ Real-time
💬 Call to action:
markdown
🚀 Ready to get started?
Tap "Install" to launch your workflow!
📄 Sample description template: Summary
markdown
🔍 Overview:
[1–2 lines summarizing your app’s purpose and who it helps.]

📦 Key Features:
✓ [Feature #1]
✓ [Feature #2]
✓ [Feature #3]

📊 Feature summary:
[Feature #1]  ✔️ Yes
[Feature #2]  ✔️ Fully supported
[Feature #3]  ✔️ Included
[Feature #4]  ✔️ Included

👥 Ideal For:
• [User group #1]
• [User group #2]

🛡️ Security & Compliance:
✓ HIPAA compliant
✓ Secure OAuth 2.0 login
✓ No patient data stored

🚀 Get Started:
Try [App Name] today to [short value prop or benefit].

📚 Learn more:
[https://link.com]
🎥 Watch demo video:
[https://link.com]
💰 See pricing options:
[https://link.com]
2. Short description (up to 120 characters):
Summarize your app with a short message and its main value. This appears in the app listing and helps users quickly understand your app’s purpose and benefits at a glance.
3. Media (images & video) section Recommended
The media section allows you to upload both images (screenshots) and demo videos to showcase your application's user experience and value. You can provide up to 5 files. Both types of media are displayed together in the app store listing, giving users a comprehensive preview of your app.
Including both images and a video increases engagement and helps users better understand your app’s interface and workflows.
- Image specs: PNG/JPG/JPEG files. Recommended size: 1920×1080 px.
- Video specs: MP4/MOV file. Recommended length: up to 2 minutes. The video should clearly demonstrate your app’s value, strengths, and limitations. Keeping the video up to date is highly recommended.
4. Resources (contact & attribution):
Developer Name: Allow users to identify the company or individual that developed the application. Contact Vim support to edit.
Developer Address: Your company full valid address. Contact Vim support to edit.
Contact Phone Number: Your company phone number. Contact Vim support to edit.
Support email: Add your developer's support email for users and the Vim team to contact the developer for troubleshooting or customer support.
Network email: Enter the email address where your team should be contacted when a Vim organization admin requests more information about your app. This ensures a smooth approval process and facilitates direct communication with interested clinics.
5. Legal:
- Privacy Policy Link: Inform users about data usage and protection.
- Terms of Service Link: Outline the legal agreement with users.
- Business Associate Agreement (BAA) Link Choose between the below options:
Add your Business Associate Agreement link (BAA): Most popular
By adding your BAA, you agree to make this BAA binding with each provider, and you agree that your access, use, processing, and disclosure of patient data, including any patient data exchanged directly between you and providers through your application, is governed solely by this BAA.
Making your BAA available on the marketplace allows clinics to review legal documents upfront, reducing friction and streamlining onboarding.No online Business Associate Agreement (BAA):
Add your standard BAA link for Vim team's review (users won't see your BAA on the store or marketplace listing). You undertake to sign a BAA with each provider who uses your app through Vim, and that such BAA will govern the disclosure of PHI by Vim to you and your processing of such PHI. Please provide explanation and justification to the Vim team.
6. Buttons (optional but highly recommended)
Primary action button text & link: E.g., “View demo video” or “see pricing options”. Make sure the video showcases your app's value, clearly demonstrating both its strengths and limitations. From our experience, listings that include detailed pricing and a strong demo video receive significantly more traffic and engagement.
Secondary action button text & link:
To help generate leads through the marketplace and connect you with existing customers, it's highly recommended to include a CTA button to your pricing page. Here’s a sample pricing structure you can use as a guide:
- Basic Tier - $/month: Includes core features
- Pro Tier - $/month: Includes advanced features such as [add brief feature info]
- Enterprise Tier - Pricing based on number of users and usage
7. Categories
Assign up to 3 categories (tags) describing your app’s main values and functionalities. To add a new category, contact [email protected].
Marketplace
This section allows you to define how your application appears, would be priced, and can be distributed within the Vim Canvas™️ Marketplace for the existing or new Vim network. These settings determine how users discover, access, and your app subscription model, and can be customized for each application version.
Visibility Settings
Control who can see your application in the Vim Application Marketplace:
Public: Make your app visible to all users on the Vim network who have Vim Connect installed. This setting maximizes discoverability, allowing users to freely explore and learn about your application.
Private: Limit visibility to specific organizations or user groups, based on your go-to-market strategy. It can only be added to specific clinics or users that you set in collaboration with your Vim account manager.
Pricing
Define how your app is monetized and how users can access it. Vim does not manage billing or payments processing. Developers are responsible for all aspects of pricing, access, and subscriptions. The Vim Application Marketplace showcases applications and use case details, provided by the developer, for end users to opt-into based on their needs.
Free Trial: Allow users to try your app for a limited time before payment is required.
Let users try your app free for a limited time before payment is required.
Developers must manage trial access, payment collection post-trial, and all billing.
SSO and auto-provisioning are strongly recommended to streamline onboarding during the trial.
Make sure to implement a logic on your code base to identify users that have after the trial period and return the ones that were not moved to paid users as “unauthorized” in your application auth flow. Please make sure to also have a logic to not changing your app activation status to “enabled” to avoid being billed for these users.
Free of Charge: Offer your app at no cost to users.
- Offer your app at no cost to users.
- Boosts adoption and lowers onboarding friction.
- No billing or payment setup is needed.
- SSO and auto-provisioning are recommended for a seamless experience.
Free with Paid In-App Upgrades: Offer a free core version of your app, with upgrade options available to users in-app.
- Developers manage all in-app paid upgrades and access controls.
- This model encourages broad adoption while supporting flexible monetization through feature-based tiers.
Paid Application: Charge clinics directly for access to your app.
Full control and responsibility over pricing, subscription management, and billing fall to you as the developer.
Vim does not facilitate or process payments.
Distribution Settings
Determine how users can access and install your application from the marketplace:
Individual user level app: Allows individual users to add the app directly from the marketplace without needing clinic admin approval.
Organization admins can still add the app for broader use.
Best for: Apps designed for individual providers or small teams.
Organization level app: Requires both the organization admin and your review to approve the application before any user within the org can access it.
- Best for: Apps designed for clinic-wide use or requiring coordinated deployment.
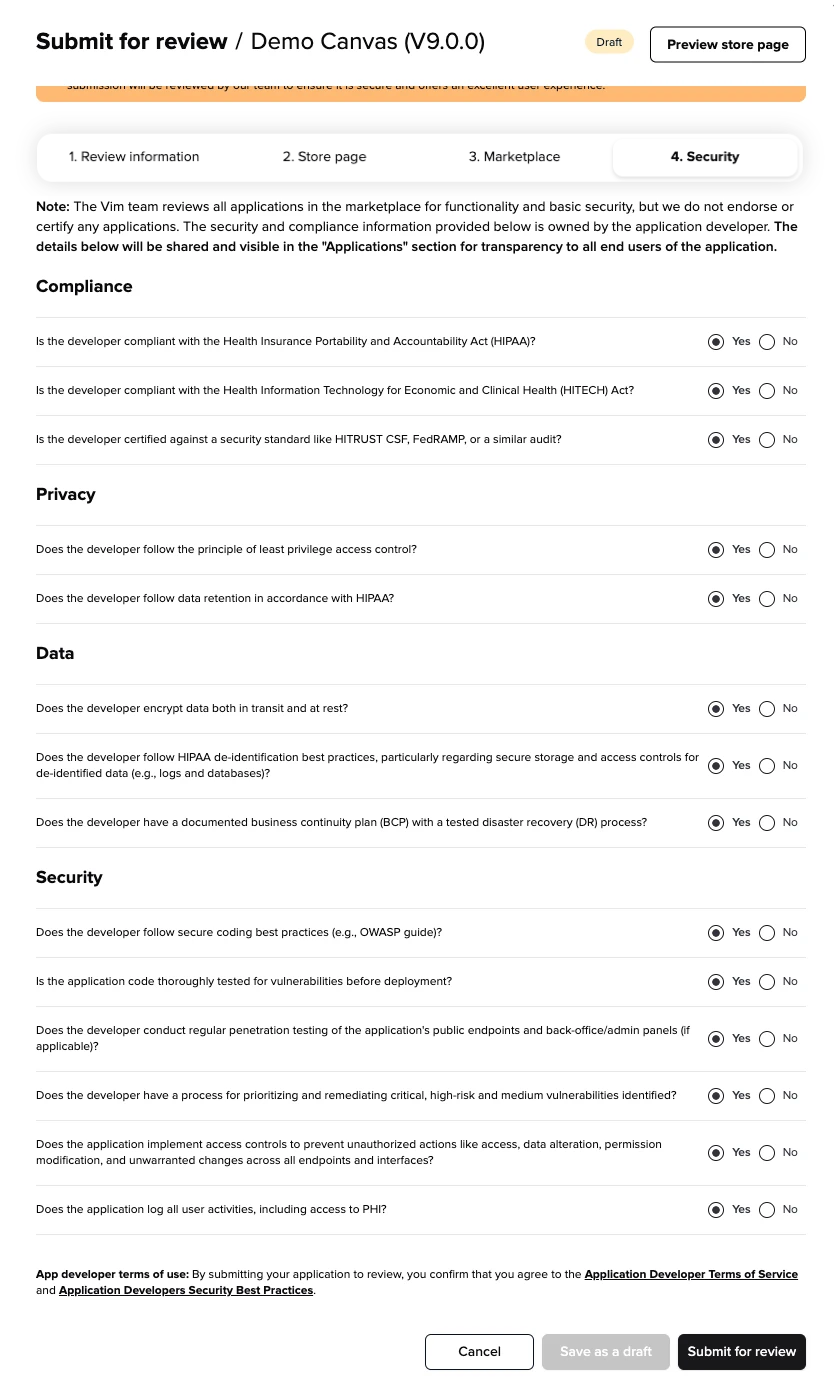
Security questionnaire
As part of the app submission process, developers must complete the security questionnaire to ensure transparency regarding the security and compliance measures of their application. While the Vim team reviews all applications for basic functionality and security, we do not endorse or certify any app. The information provided in the security questionnaire is owned by the developer and will be displayed in the "Applications" section, offering end users visibility into the app's security practices. This helps build user trust and ensures clarity around data protection measures.
Preview your application store page
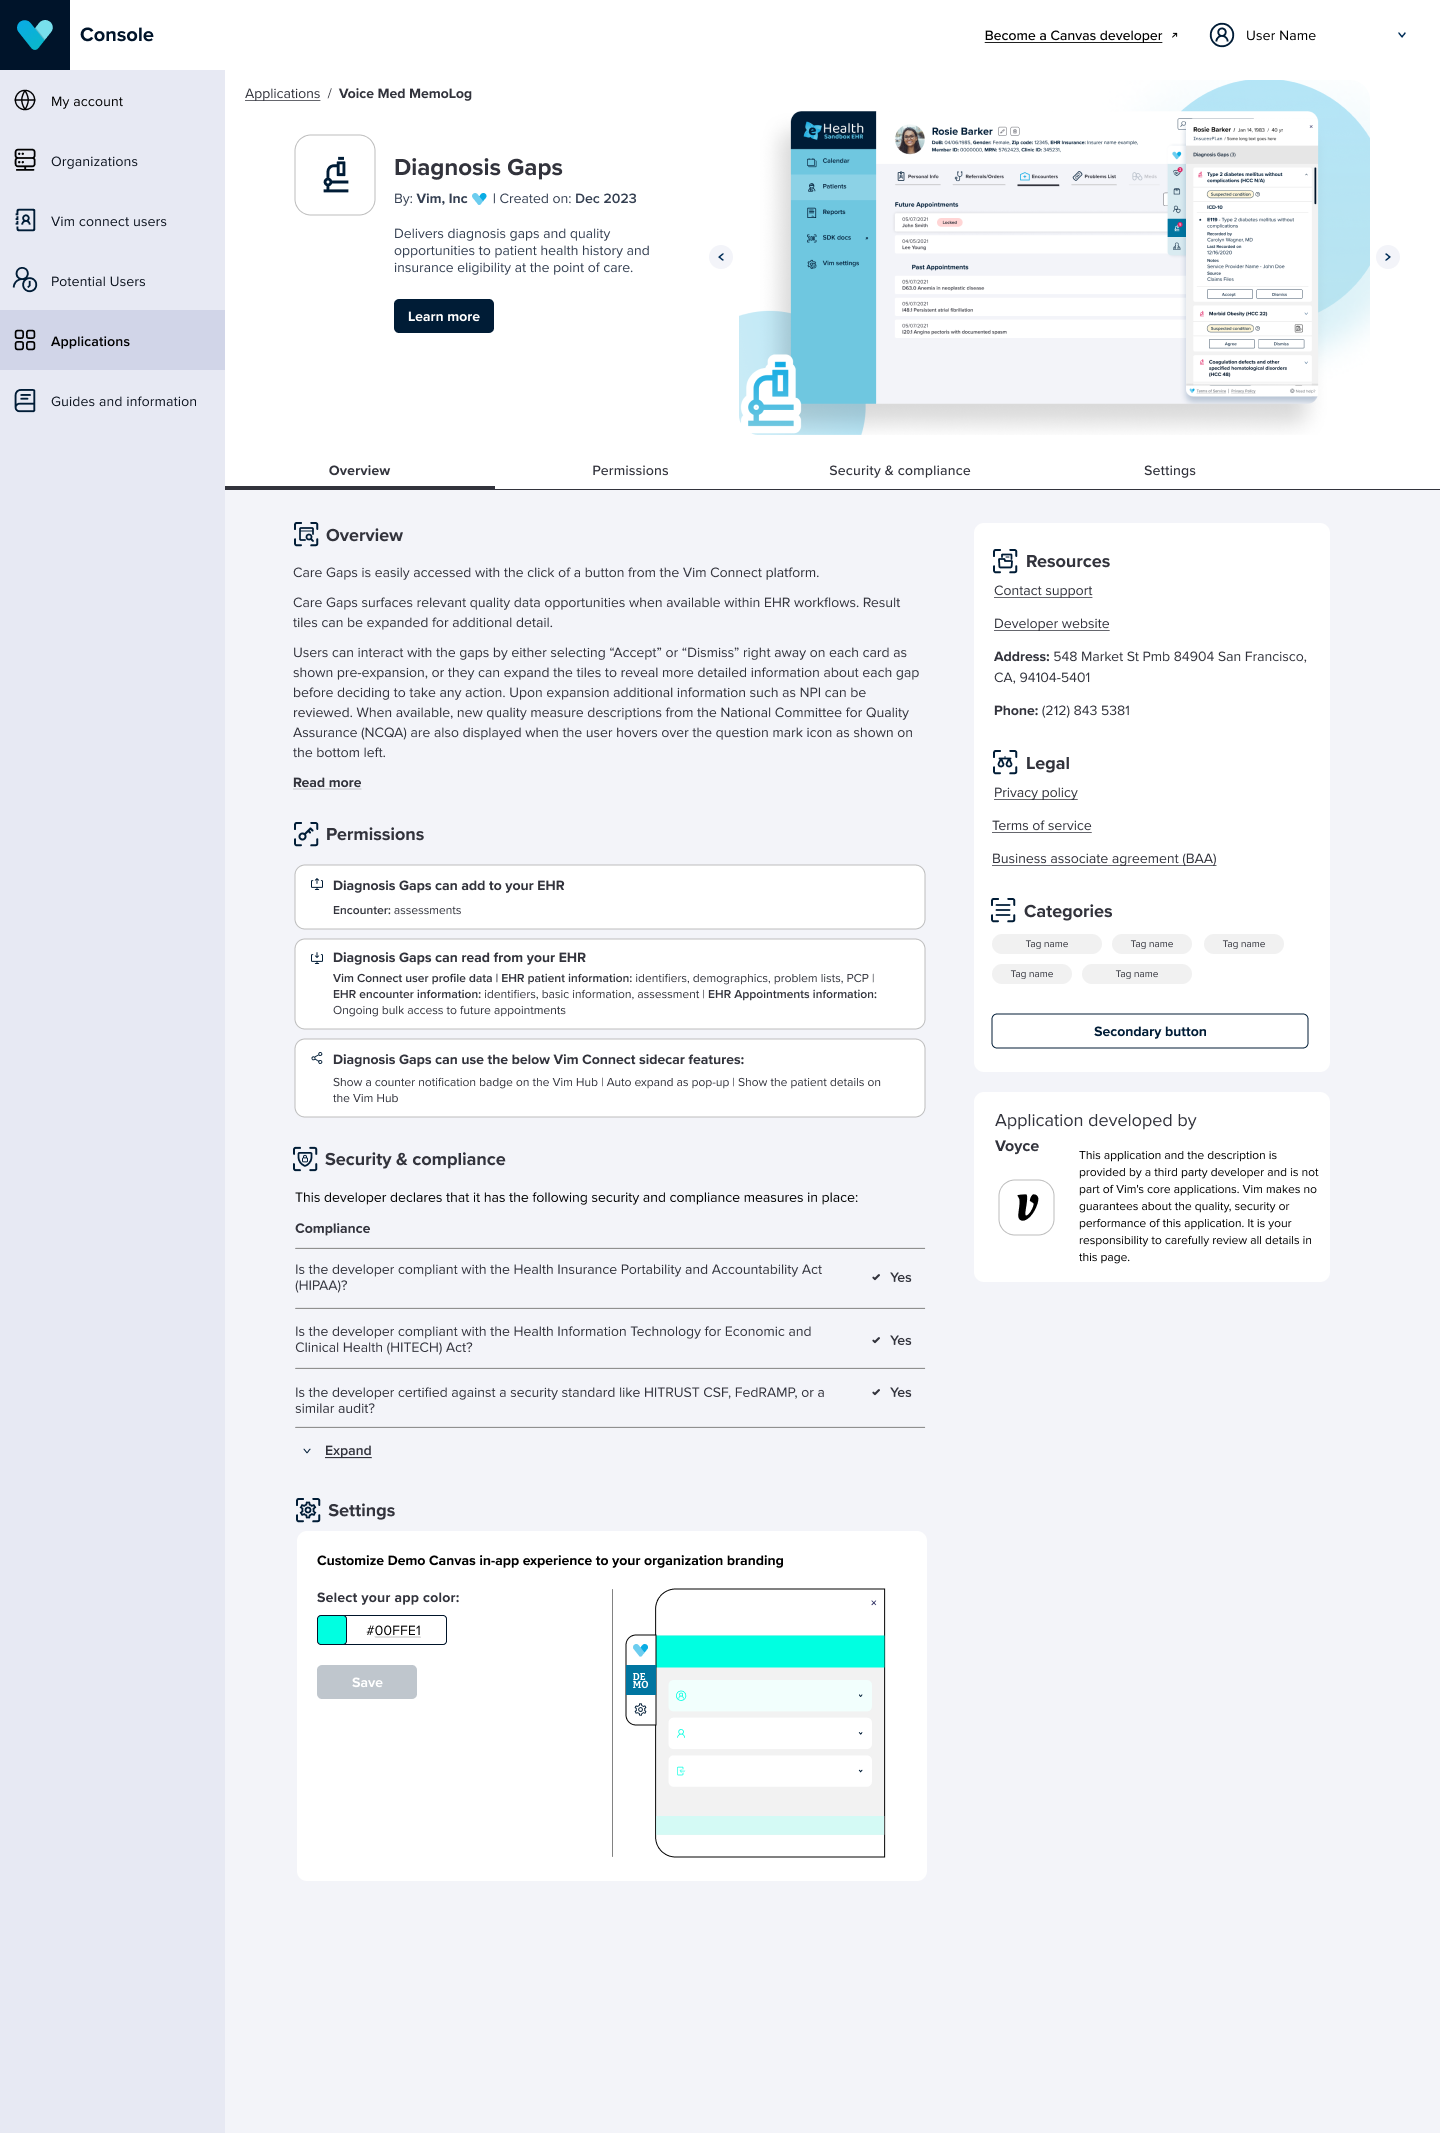
Before submitting your application for review, you can preview how your application hub page will display to Vim console users. On the Applications tab, providers will see their list of installed applications and each installed application has a dedicated page that acts as a central hub for key information. The page includes essential information about the application information and brand, description, permissions, security & performance, developer additional information, CTA buttons to more details such as training, video or other relevant information and more. It also gives app developers an opportunity to present their applications in the best light, fostering trust, transparency, and engagement with users.
- The application settings will be presented in this page under the "Settings" tab, where administrators can access and configure your application.
To preview your application store page:
- Click on Manage versions from the Applications tab.

- Click on the specific version you want to preview your store page.
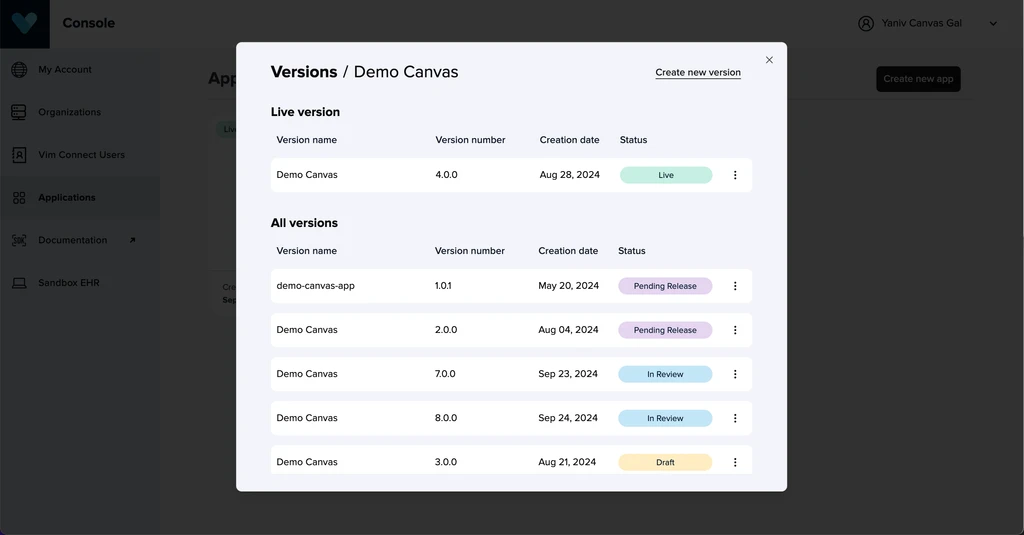
- Click on Review & submit to submit for review

note
TIP
If your application is in review, pending release or live, you won’t be able to edit the submission form. You can always click on View submission form to preview the store page or duplicate the current application version to edit the submission form and store page.
- Click on Preview store page.
- You will see how your application store page will display to Vim console users.
note
TIP
Note the application settings at the bottom of the page.
Changing settings example:
Default view
Changing settings
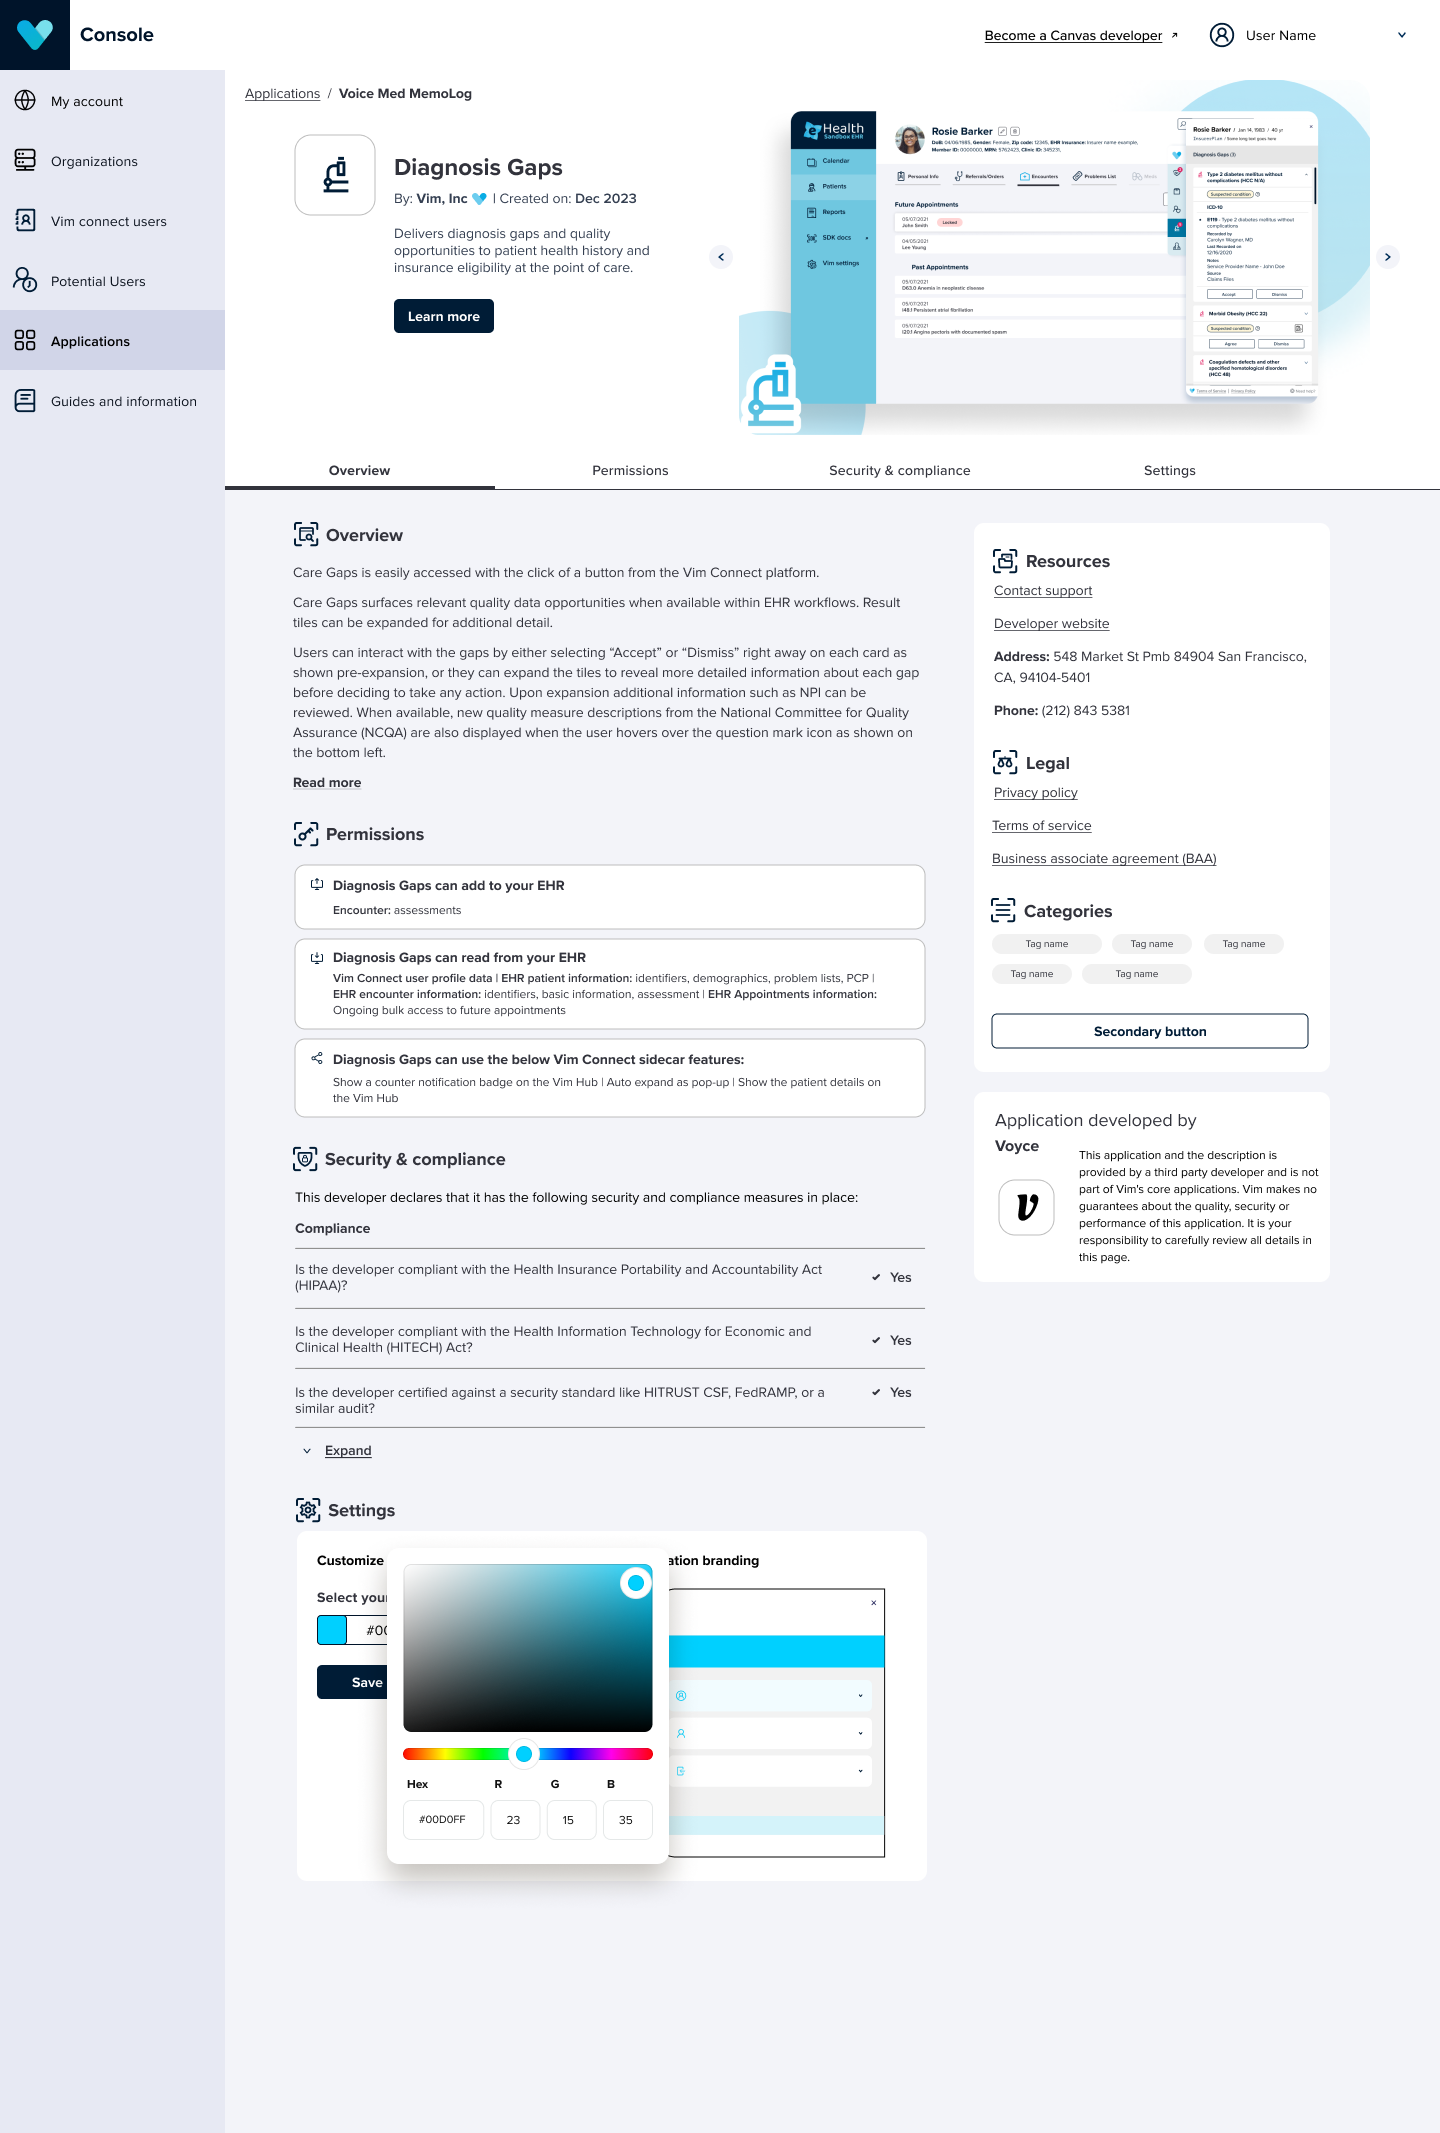
Settings changed successfully

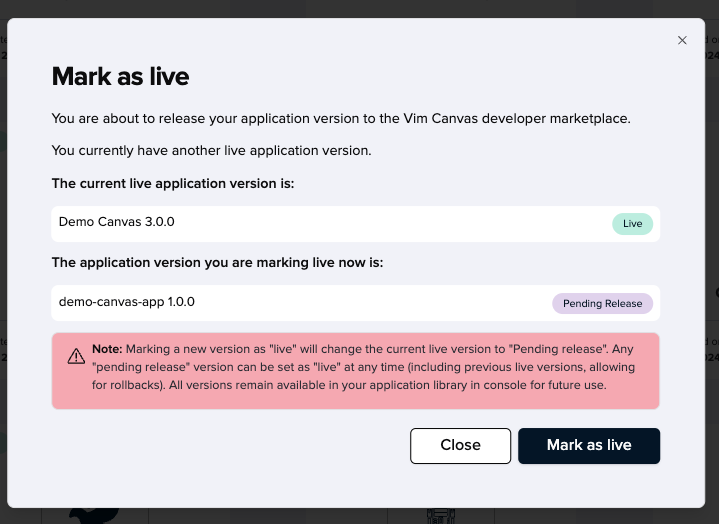
Marking your application as live
Once your application has been reviewed and approved by the Vim review team, you can publish it to make it available to end users.
To publish an application:
- Click on Manage version from the Applications tab.
- Click on the action menu on the specific app version you want to publish.
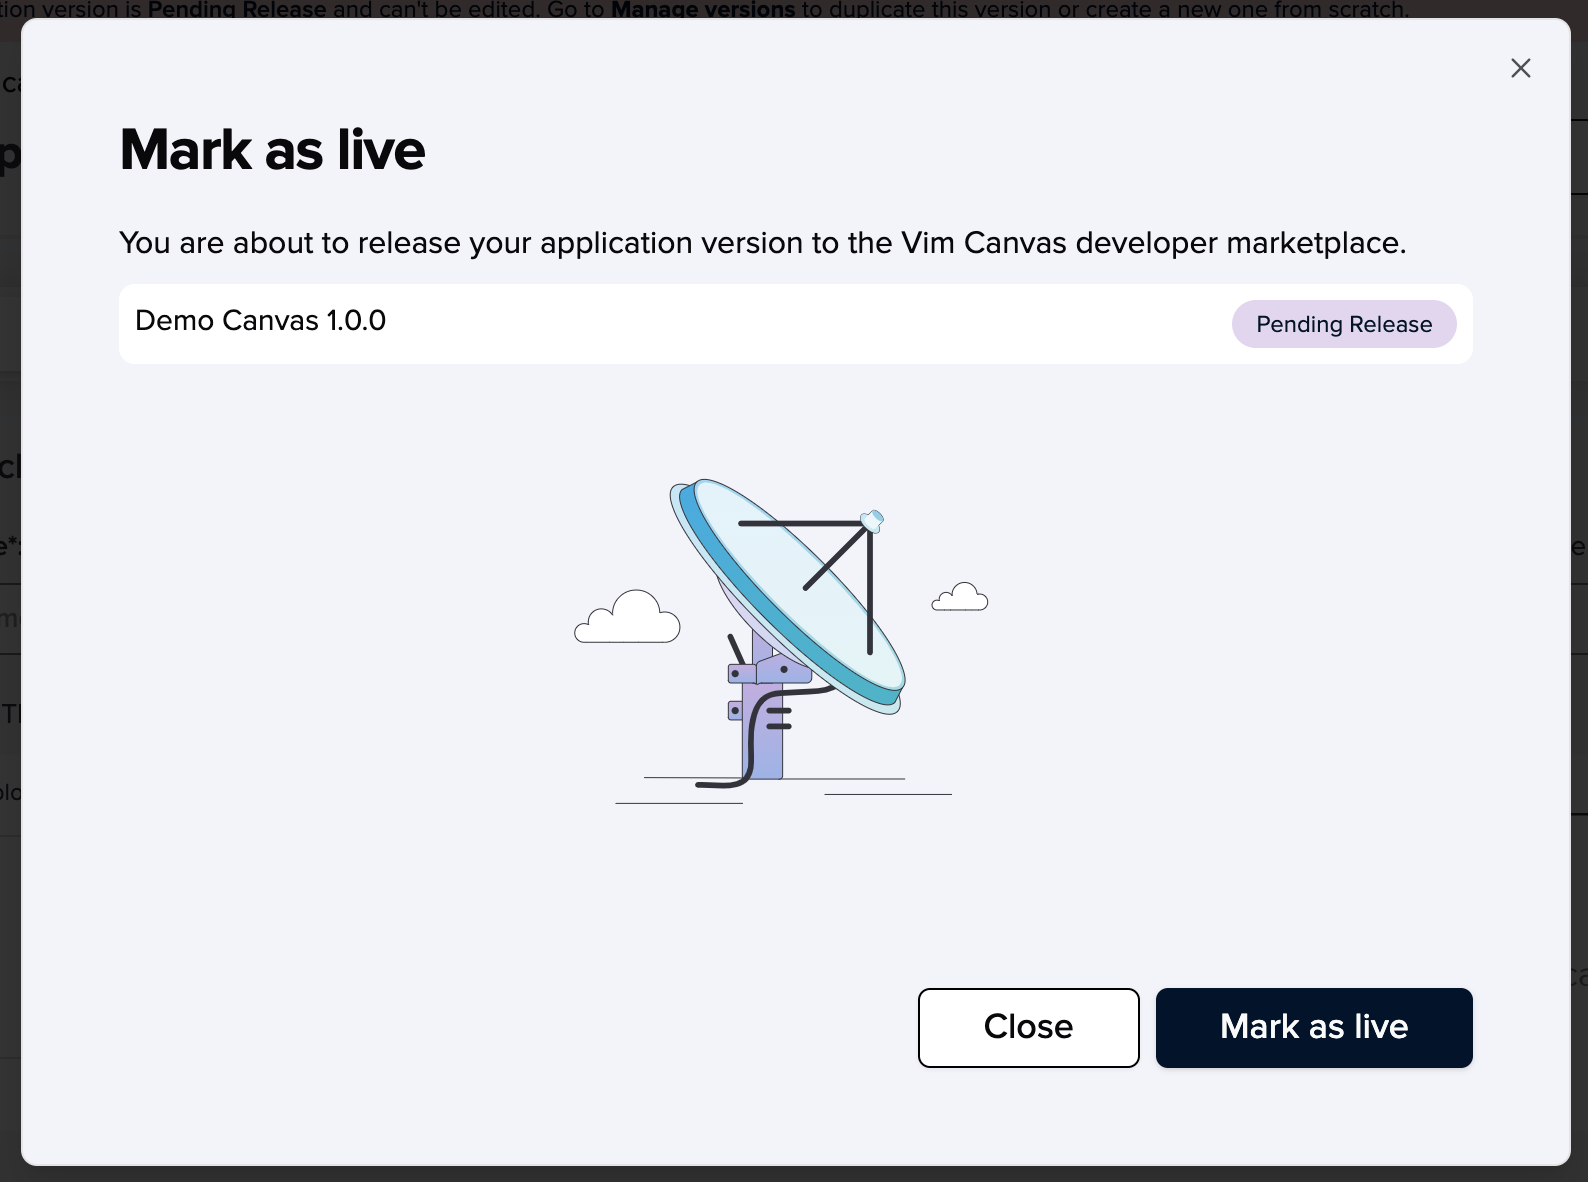
- Click on Mark as live.
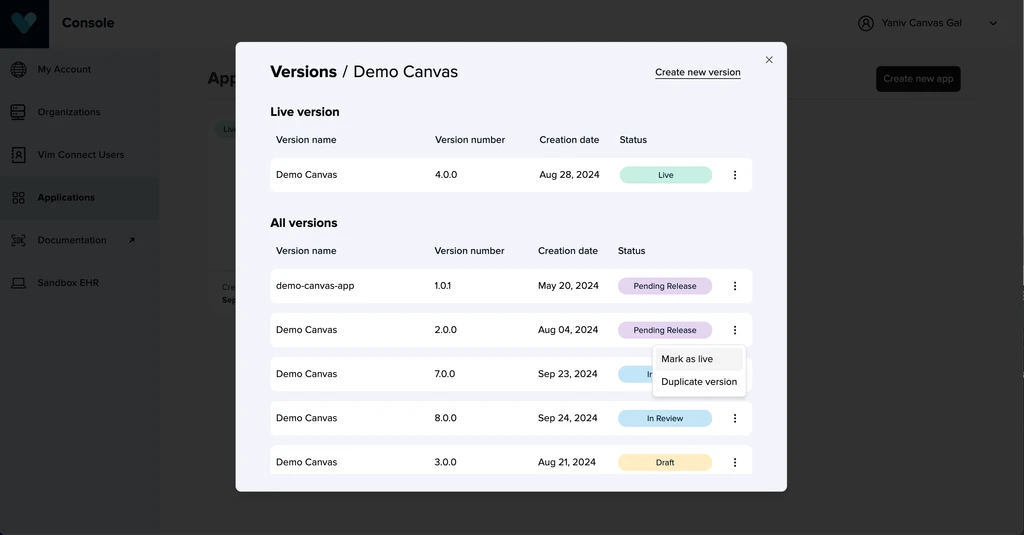
- On the confirmation modal, click on Mark as live.
note
TIP
You can only have one live version at a time. When you mark a pending release version as live, the current live version will return to pending release status. Any pending release version can be set as live at any time (including previous live versions, allowing for rollbacks). All versions remain available in your application library in console for future use.