Appearance
Adding data to the Sandbox EHR
On the Sandbox EHR, you can create patients, encounters, referrals, orders and more. All of the data you add to the Sandbox EHR will be stored under your account instance and available to other users belonging to your account.
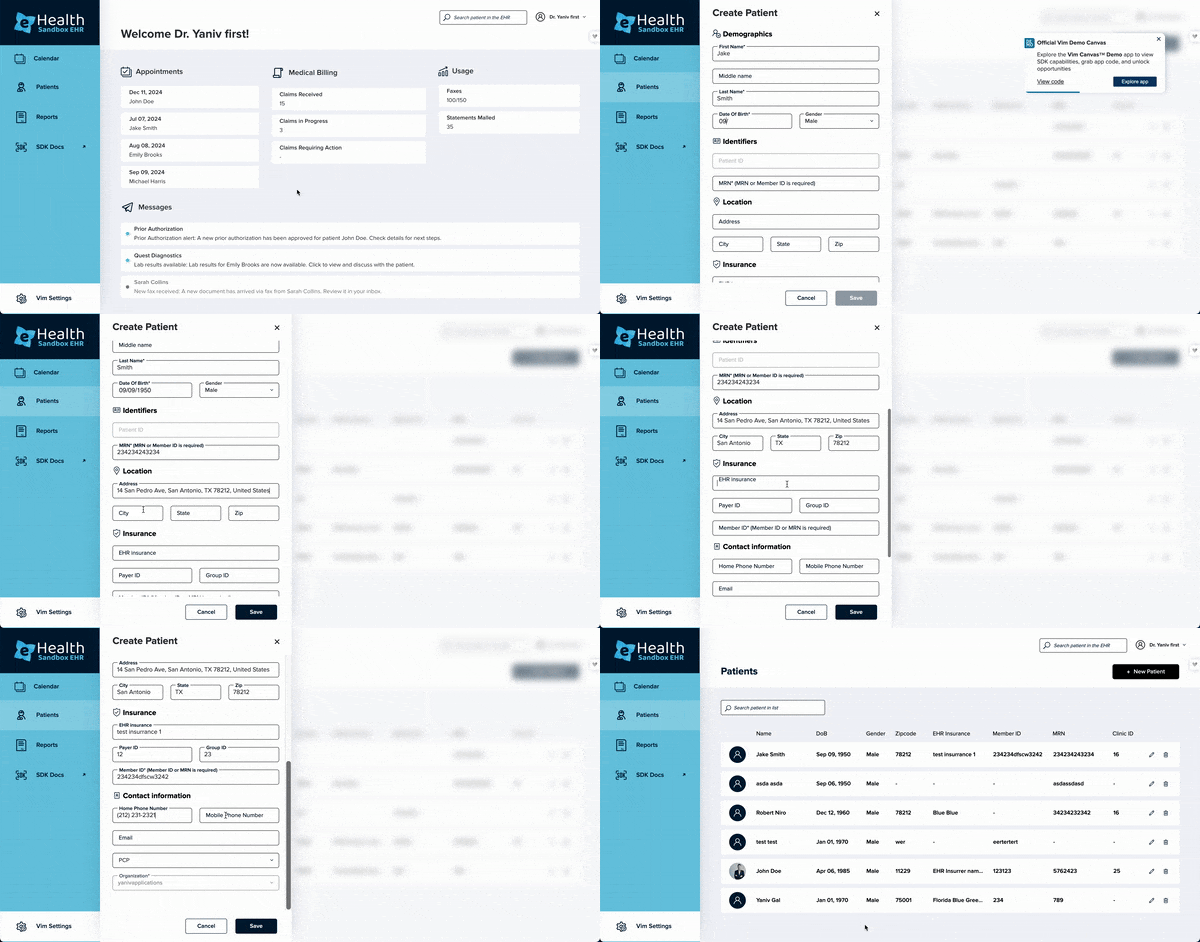
Creating a new patient
- Click on “Patients” on the left menu to navigate to the Patients page.
- Click the “New Patient” button on the top right corner.
- Fill in patient information. All fields marked with * are mandatory.
- Click on "Save".
Creating a patient encounter
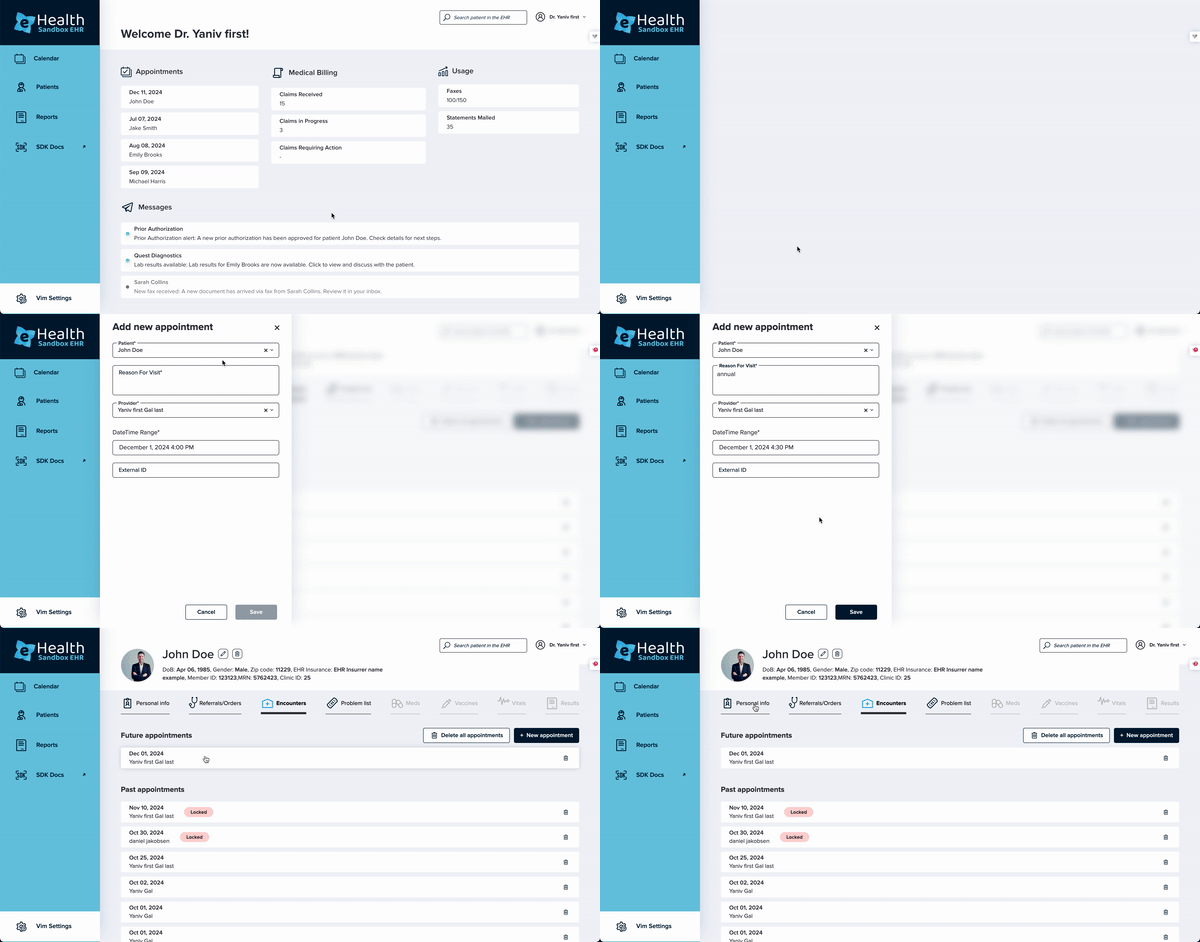
- Click on "Patients" on the left menu to navigate to the Patients page.
- Click on a patient to select it.
- Click on the "Encounter" tab.
- Click on the "New Appointment" button.
- Fill in the appointment information:
- Reason for the visit - can be any string.
- DateTime range - can be any future date.
- External ID - not mandatory, used to link encounter ID with an external one when needed.
- Click "Save".
- Under Future Appointments, select an encounter by clicking on "Clinical Notes".
- You are now in the encounter modal.
Locking an encounter
- Click on "Patients" on the left menu to navigate to the Patients page.
- Click on a patient to select it.
- Click on the "Encounter" tab.
- Under Future Appointments or Past Appointments, select an encounter by clicking on "Clinical Notes".
- In the encounter modal, locate the status field in the encounter's basic information.
- Change the status to "LOCKED".
- Click "Save" to lock the encounter.
Once an encounter is locked, its data becomes read-only and cannot be modified. In terms of the SDK - Writeback will be locked, canUpdate will be false.
Creating a patient referral
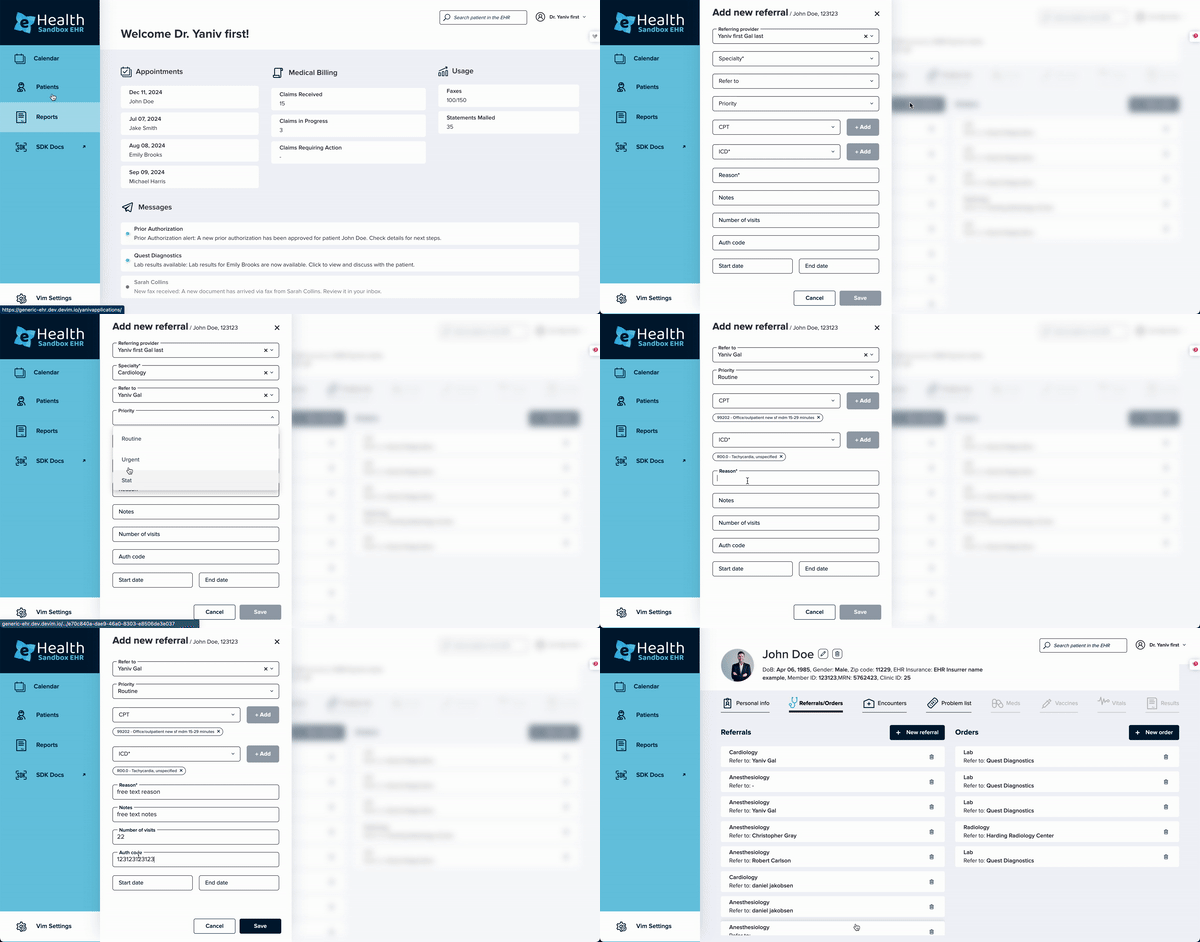
- Click on "Patients" on the left menu to navigate to the Patients page.
- Click on patient to select it.
- Click on "Referrals/Orders" tab.
- Click on the "New Referral" button.
- Fill in the referral information.
- Click on "Save".
Locking an encounter
Creating a patient order
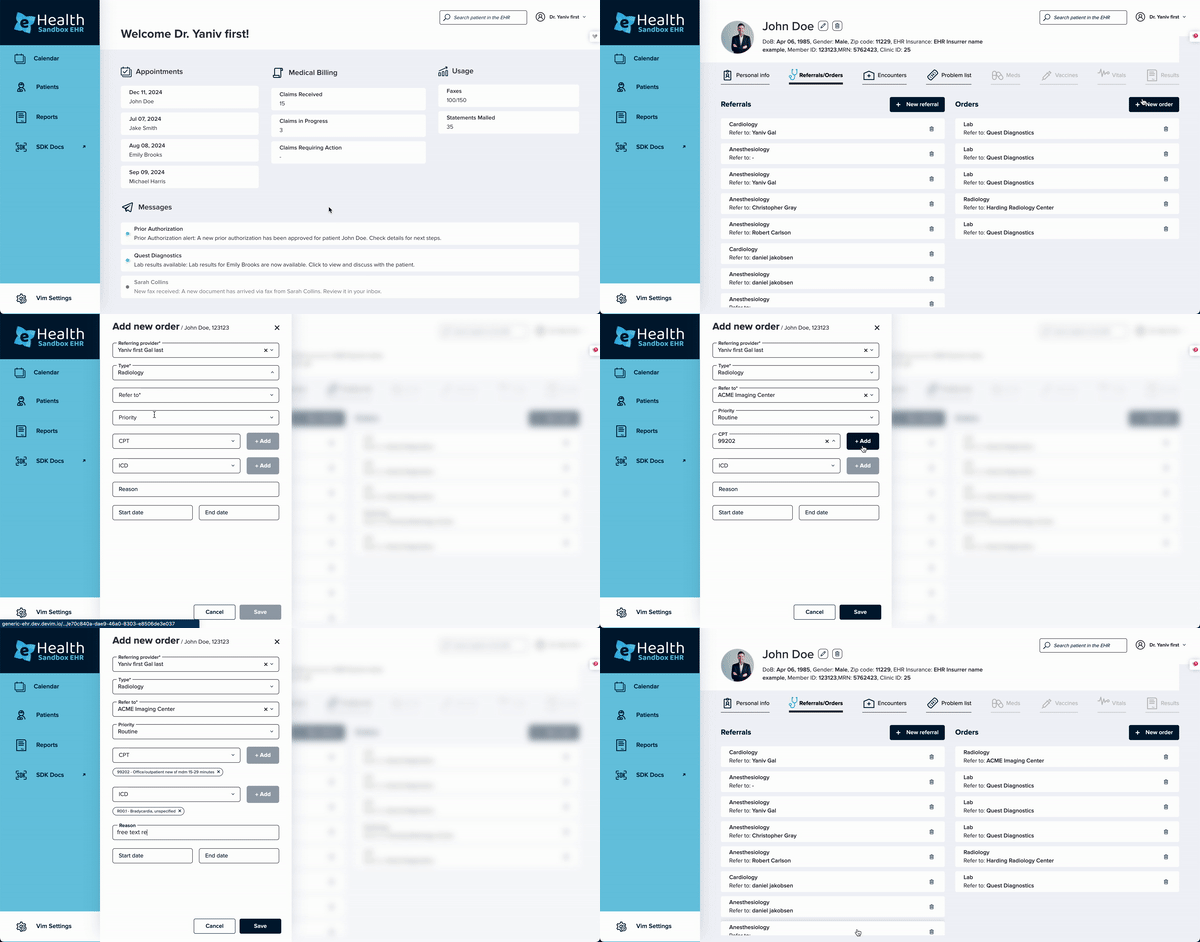
- Click on "Patients" on the left menu to navigate to the Patients page.
- Click on a patient to select it.
- Click on "Referrals/Orders" tab.
- Click on the "New Order" button.
- Fill in the order information.
- Click on "Save".
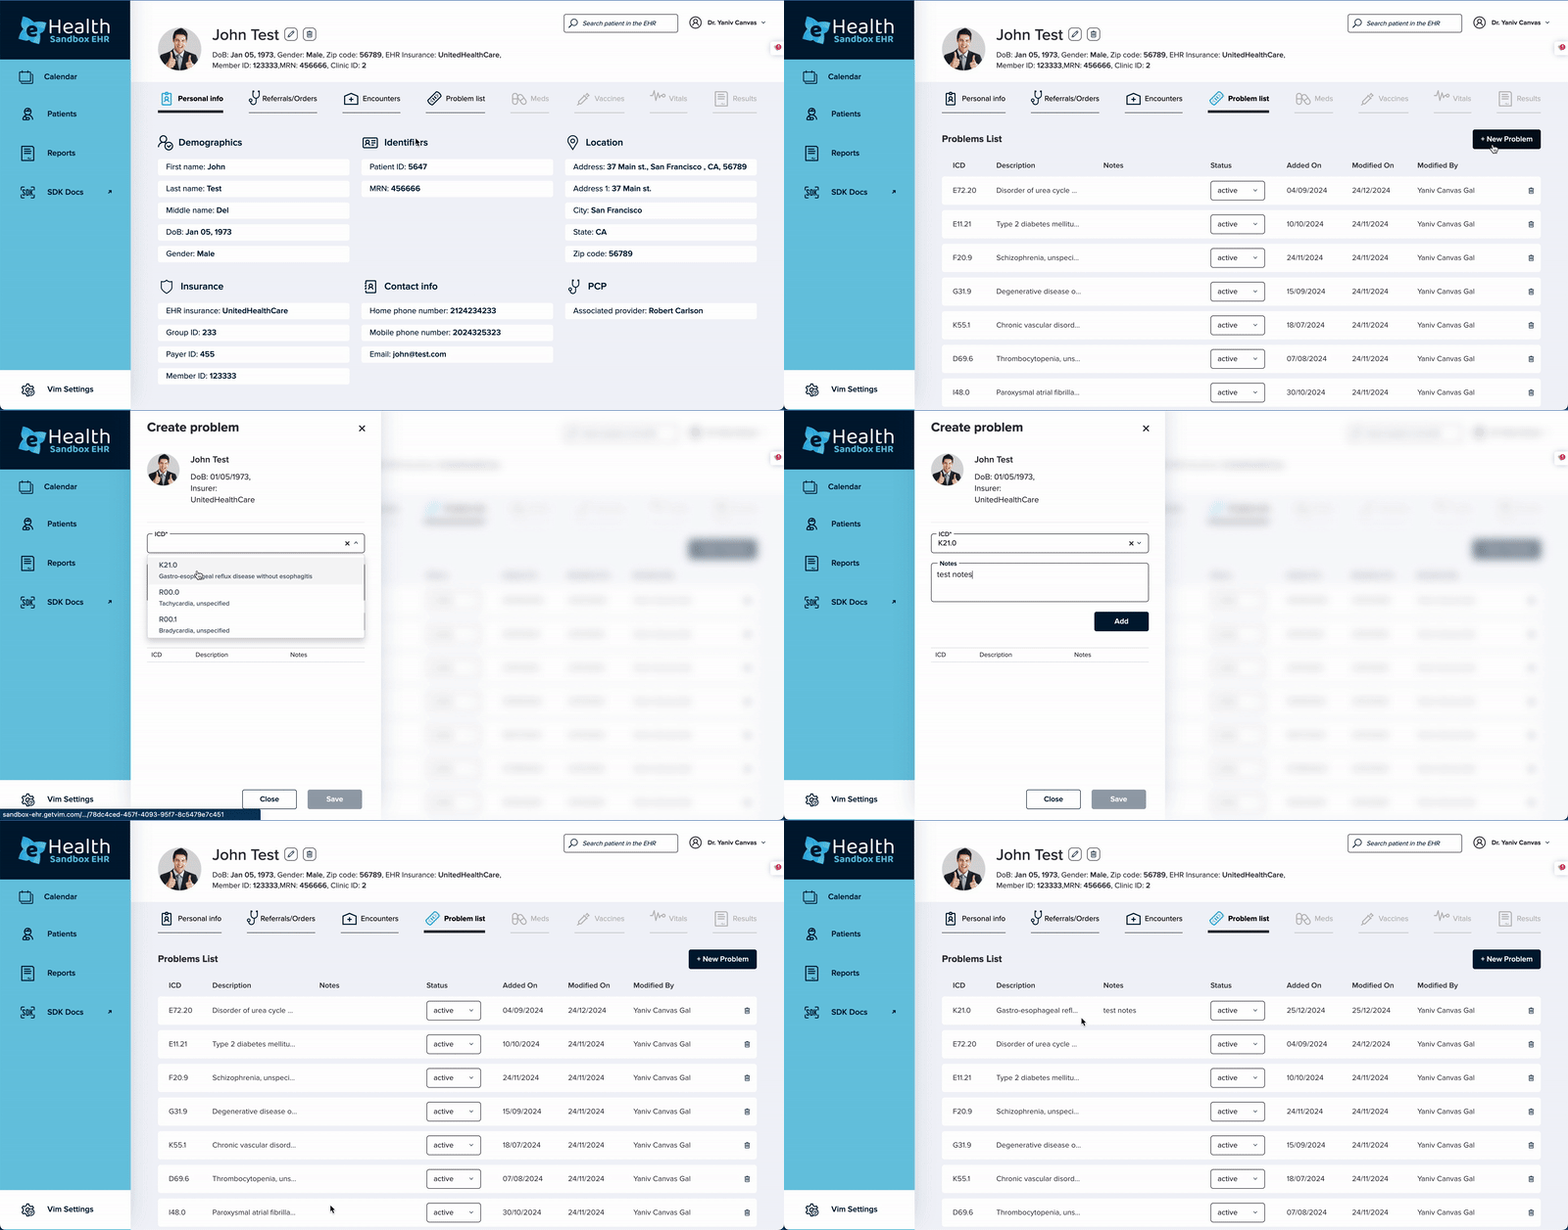
Adding problems to the problem list
- Click on "Patients" on the left menu to navigate to the Patients page.
- Click on a patient to select it.
- Click the "Problem list" tab.
- Click the "New problem" button.
- Search diagnosis by ICD code.
- Add a comment under "Notes" (can be any string).
- Click on "Add".
Creating a patient claim
Claims can be created in two ways:
Option 1: From the Claims page
- Click on "Claims" on the left menu to navigate to the Claims page.
- Click the "New claim" button on the top right corner.
- Fill in the claim information:
- Patient - Select a patient from the dropdown (required).
- Appointment - Optionally link the claim to an existing appointment.
- Rendering Provider - Select the provider who rendered the service (required).
- Service Date - Date the service was provided (required).
- Claim Date - Date the claim was filed (required).
- Place of Service - Select the location type where service was provided (required).
- Claim Status - Select the current status of the claim (required).
- Insurance Name - Name of the patient's insurance provider (required).
- Additional ICD Codes - Optionally add additional diagnosis codes.
- Add service lines by clicking "Add Service Line":
- CPT Code - Procedure code for the service provided (required).
- Units - Number of units of the service (required).
- Diagnosis Codes (ICD) - Select one or more diagnosis codes (required).
- Procedure Modifiers - Optionally add modifiers to the procedure code.
- Click "Save".
Option 2: From a patient's profile
- Click on "Patients" on the left menu to navigate to the Patients page.
- Click on a patient to select it.
- Click on the "Encounter" tab.
- Select an encounter or create a new one.
- Click on the "Claims" tab within the encounter.
- Click the "New claim" button.
- Fill in the claim information as described in Option 1 (the patient and appointment will be pre-selected).
- Click "Save".
Creating and accessing items from the queue
In addition to creating encounters, referrals, orders, and claims from the patient page, you can also manage these items directly from their respective queue pages. The queue pages allow you to view, create, and access all items across all patients in one place.
Accessing queue pages
You can access the queue pages from the left sidebar menu:
- Encounters - Click on "Encounters" in the left menu
- Referrals - Click on "Referrals" in the left menu
- Orders - Click on "Orders" in the left menu
- Claims - Click on "Claims" in the left menu
Creating items from the queue
To create a new item directly from a queue page:
- Navigate to the desired queue page (Encounters, Referrals, Orders, or Claims) from the left menu.
- Click the "New [Item]" button in the top right corner (e.g., "New encounter", "New referral", "New order", or "New claim").
- Fill in the required information in the modal that appears.
- Click "Save" to create the item.
Viewing and editing items from the queue
To view or edit an existing item from a queue page:
- Navigate to the desired queue page from the left menu.
- Use the search and filter options to find specific items if needed.
- Click on an item in the list to view or edit it.
- Make your changes in the modal or detail page that opens.
- Click "Save" to update the item.
Note: For encounters, clicking on an item from the queue will navigate you to the patient's encounter page where you can view and edit the encounter details.
