Appearance
Introduction
vimOS.hub is where you will find the tool to leverage Vim Connect features.
Activation status
vimOS.hub.setActivationStatus(ActivationStatus)
Control your application availability in the Vim Hub.
ts
 /*
  * The activation status of your app.
  *
  * - `'DISABLED'`: Your app's default activation status. Your application appears grayed out in Vim Hub and cannot be opened unless its status is changed to Enabled. If Disabled while the app state is "open", the app will close and become inaccessible."
  * - `'LOADING'`: The app's icon will blink and won't be clickable.
  * - `'ENABLED'`: The app's icon will be colored and will be clickable.
  *
  */
type ActivationStatus = 'DISABLED' | 'LOADING' | 'ENABLED';
Example (GIF)
The status is then set to loading as it processes business logic data based on the state of the specific EHR. It is then set to enabled once the application business logic has completed returning the data and request to be active in Vim Connect Hub. 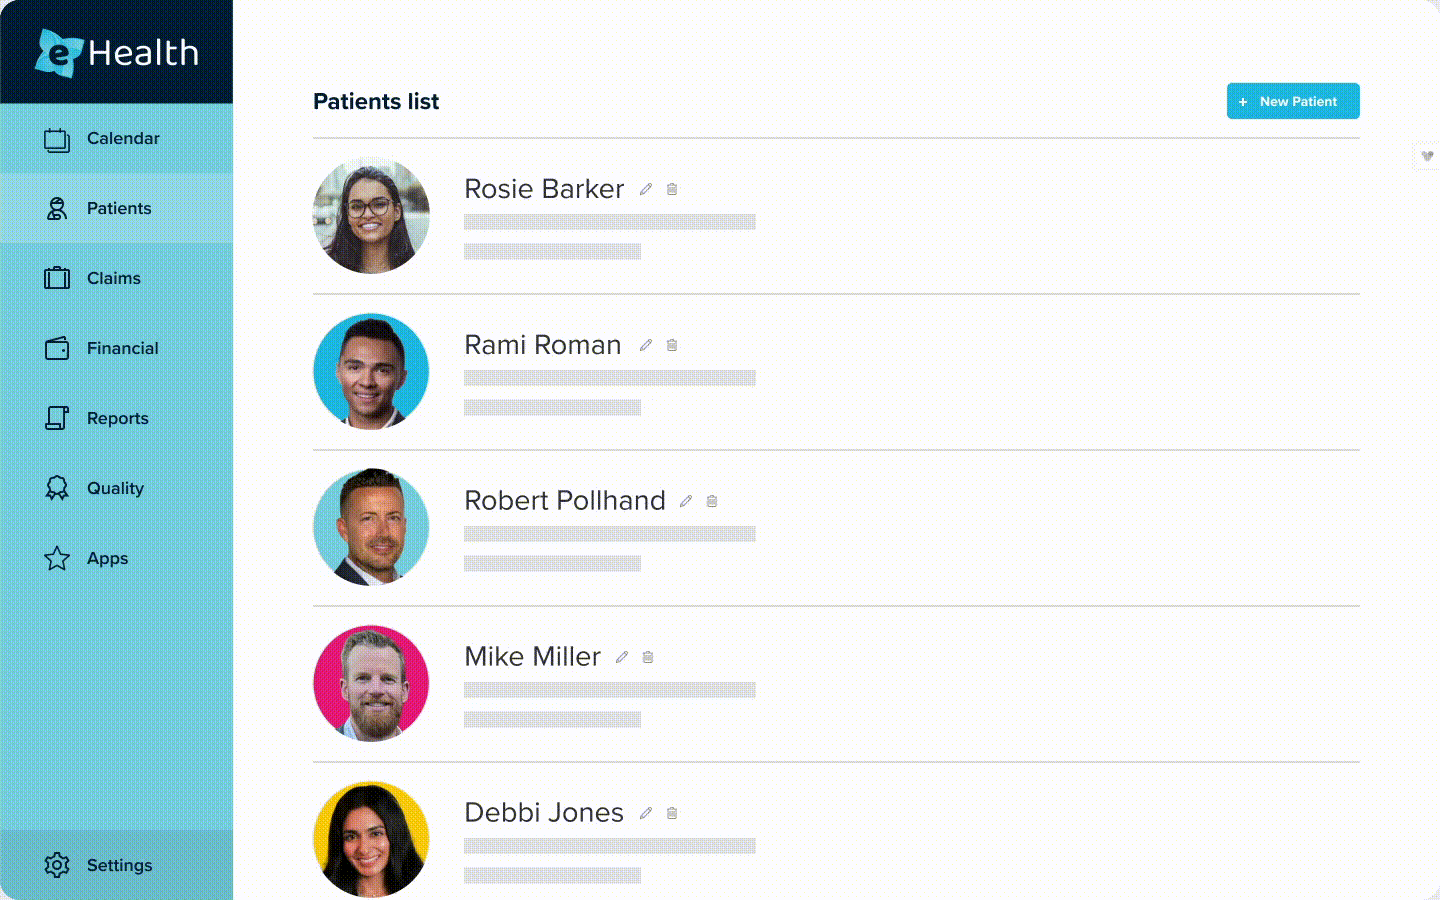
Code example
ts
vimOS.hub.setActivationStatus('LOADING');Best practices
- The
DISABLEDstate indicates that the application is not currently accessible to users. This will display both your application icon as well as the Vim Connect Hub main icon as disabled (pending there is no other applications in loading or enabled status). - The
LOADINGstate is useful when the application needs to fetch and process information from the EHR before becoming fully active. During this loading phase, you can show a visual indication to users that your application is processing data. Once the application's business logic has processed the relevant information, you can then set the activation status to enabled, indicating that the application is ready for use. - The
ENABLEDstate indicate that your application can be currently accessible to users.
Tooltip text
vimOS.hub.setTooltipText(tooltipText)
Customize the text displayed when users hover over your application icon on the Vim Hub.
note
TIP
By default, your application tooltip text will display your application name as set in the manifest. The vimOS.hub.setTooltipText(TooltipText) allows you to dynamically override this to the text of your choice if relevant.
Example (GIF)

Code example
ts
vimOS.hub.setTooltipText("a nice and clear tooltip");limitations
TIP
- There is no character limitation for the tooltip text but an ellipsis (…) will display after 50 characters for a consistent user experience.
- If the goal is to share a more extensive text, we recommend using the Push notification function.
Best practices
When your application activation status is disabled, users will not be able to access your application. The tooltip text will help users to get familiar and identify your application. You can customize the tooltip text and display a dynamic text based on the patient name available trough the state or the actual state name for example: "Open application name for this encounter" or "Open application name for John Doe".
Dynamic app size
vimOS.hub.setDynamicAppSize(ApplicationSize)
Set and change dynamically your application app size on the Vim Hub.
Note:
TIP
By default, your application will open with the size you have set up on the manifest. If you want your application to open with the size set up in the manifest, there is no need to use the setDynamicAppSize function. To learn more about best practices and use cases to set up a different app size, refer to the best practices section below.
ts
/*
* The size of your app.
*
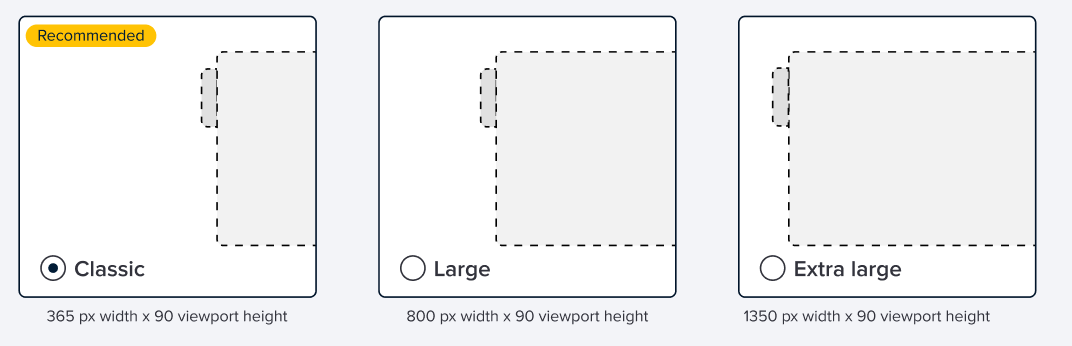
* - `'CLASSIC'`: height: 90vh; width: 365px;
* - `'LARGE'`: height: 90vh; width: 800px;
* - `'EXTRA_LARGE'`: height: 90vh; width: 1350px;
*
*/
type ApplicationSize = 'CLASSIC' | 'LARGE' | 'EXTRA_LARGE';Example (GIF)
Code example
ts
vimOS.hub.setDynamicAppSize('EXTRA_LARGE');limitations
TIP
The dynamic app size will remain the same during the active application session. Once your application activation status changes from enabled to disabled, the app size will be reset to its default size as specified in the manifest. Upon re-opening, the app will automatically be set to the size specified in the manifest provided you don't trigger the dynamic app size function again.
Best practices
We recommend choosing a classic size to avoid blocking too much of the EHR real estate. Aim to balance between a great in-app user experience, and minimizing disruption to workflow.
Depending on your application use case, if your application is for example a multi pages or have different user experience flows, you can dynamically change the app size when you are showing a video iframe, large table or any other user experience that required momentary larger space than the default app size.
Notifications badge
Required permissions
WARNING
You must declare the notificationBadge permission in the Developer Console to use this call.
Show notification badge
vimOS.hub.notificationBadge.set(notificationNumber);
Show a visual badge indication (with or without a number) on your application icon on the Vim Connect Hub.
Example (GIF)
A badge notification displays on the application's icon with the counter set as "3". It is then updated to "2" as the user is doing specific actions in the application: ![]()
A badge without any numerical value: ![]()
Code example
ts
vimOS.hub.notificationBadge.set(2); // show a badge with the number 2

vimOS.hub.notificationBadge.set(0); // show an empty badge
Hide notification badge
vimOS.hub.notificationBadge.hide();
Hide the badge indication on your application icon on the Vim Connect Hub.
Code example
ts
vimOS.hub.notificationBadge.hide();Push notification
Required permissions
WARNING
You must declare the pushNotification permission in the Developer Console to use this call.
Show Push Notification
vimOS.hub.pushNotification.show(NotificationDetails) → Promise<TriggerResult>
Show a momentary push notification on the Vim Connect Hub.
A notification has the following structure:
ts
interface NotificationDetails {
/**
* The text to display on your push notification.
* 1. After roughly 30 characters, depending on the specific characters used, the text will be truncated with an ellipsis (...).
* 2. You can customize the text description to include plain text or add a <b> tag on specific sections to highlight the most important items.
* 3. Only <b> tag are currently supported. Do not send different HTML tags as the push notification will not be triggered.
* 4. You can create break lines using a \n in the text.
* 5. Emojis can be added by pasting the emoji (😀) or by adding its html unicode ( 😀 ).
**/
text: string;
/**
* The push notification notification Id
* 1. You are responsible for creating and sending the notification ID from your application in the function request.
* 2. The ID format can be numbers, characters, or a combination of both.
**/
notificationId: string;
/**
* The timeout time when the push notification will automatically be hidden if there is no interaction
* 1. The time should be set in seconds.
* 2. Maximum allowed time is 30 seconds.
* 3. If not set, the default timeout is 12 seconds.
**/
timeoutInSec?: number;
/**
* Add the actionButton object to display CTA action buttons on your push notification (if relevant). You can also customize their location (left or right) and specify button text.
**/
actionButtons?: {
leftButton?: ActionButton;
rightButton?: ActionButton;
}
};
interface ActionButton {
/*
* Set the text to display on your push notification action button
*/
text: string;
/*
* Set your push notification action button. The two options available are: Primary and Link. The available options are:
* 1. Primary buttons should initiate the primary action of any given main action or flow. It will show your action button text on a colored background.
* 2. Link buttons should represent different types of action such as a secondary action, or flow of your application or you can use it to add an option for the user to "Dismiss" the notification.
* Avoid having more than one primary button available to the user at a given time.
*/
buttonStyle: 'LINK' | 'PRIMARY';
/*
* Set if the on-click action should trigger to open your application
*/
openAppButton?: boolean;
/*
* Set the application function that should trigger upon the click of the button.
*/
callback: () => void;
};Returns a Promise that resolves with a TriggerResult so you can tell whether the request was sent, blocked, or failed. See TriggerResult type for the full type definition.
INFO
Previously, pushNotification.show() threw a synchronous error when the app was not allowed by manifest. It now returns a Promise that resolves to { status: 'blocked', type: 'not_allowed_by_manifest', description: '...' }. If you used try/catch for capability errors, update your code to check the returned status (and type when status === 'blocked') instead.
Best practices
- Push notifications is the ultimate recommended way to provide timely and personalized information and increase your application awareness, engagement and overall value by delivering important messages in a push notification layout without the need for users to actively open your application. These notifications serve as a non intrusive engagement tool, encouraging users to interact more frequently with your application.
- Primary buttons initiate the primary action of any given main action, flow. Avoid having more than one primary button available to the user at a given time. It will show your action button text on colored background. Link button should represent a different types of action such as a secondary action, flow of your application or you can use it to add an option for the user to "Dismiss" the notification.
limitations
TIP
- You can only trigger this function when:
- Your application activation status is enabled(see setActivationStatus).
- The Vim Hub is currently closed (for a consistent user experience, push notifications only show when the user is not currently interacting with an application).
- There was no notification displayed today with the same notification ID.
- For a consistent user experience, push notification with the same notification ID can only be displayed once per day.
- You can only show one notification at a time for your application. If you ask to show a new notification when another notification is already displayed for your app, the notification will be replaced with the new one.
- The max timeout for a notification is 30 seconds, after which it will disappear.
- The maximum number of characters to display in an Action button is roughly 30, depending on the specific characters used.
note
TIP
- The app icon displayed in the top section of push notifications cannot be customized through the push notification feature. It is determined by the app's manifest in the developer console.
- The app title displayed in the top section of push notifications cannot be customized through the push notification feature. It is determined by the app's manifest found in the developer console
Hide push Notification
vimOS.hub.pushNotification.hide()
Hide the push notification from the Vim Connect Hub.
Example (GIF)
See here an example of a push notification with a left button set as a Link button style and a right button Primary button with the openAppButton set as true: 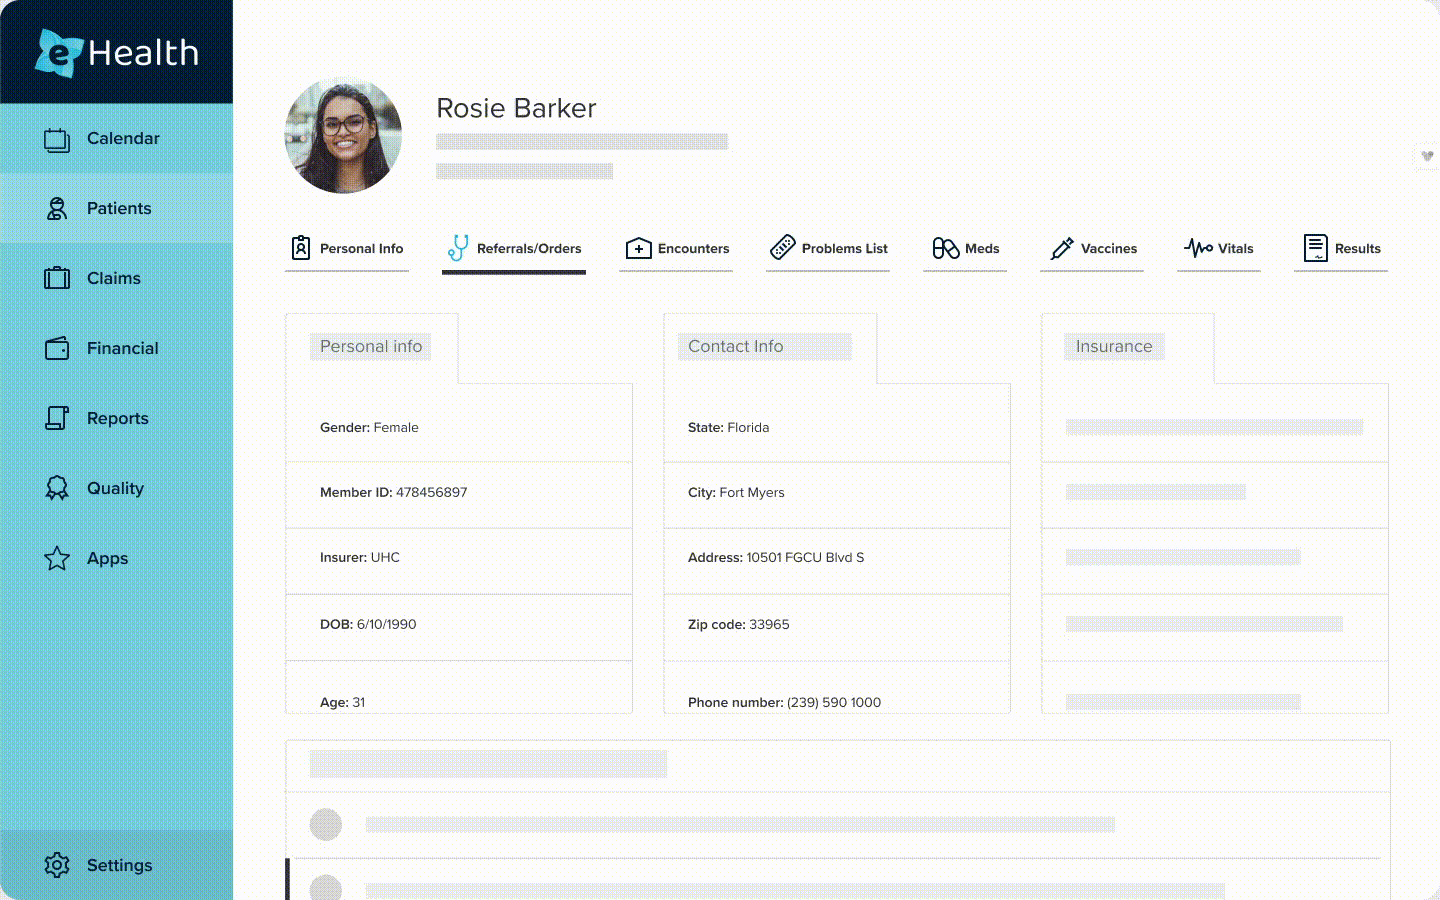
Code example
ts
const result = await vimOS.hub.pushNotification.show({
  text: 'hello there!',
  notificationId: 'some-id',
  actionButtons: {
    leftButton: {
      text: 'click me!',
      buttonStyle: 'PRIMARY',
      openAppButton: true,
      callback: () => {
        console.log('user clicked the button!');
      },
    },
  },
});

if (result.status === 'sent') {
  // Notification was shown
} else if (result.status === 'blocked') {
  // result.type is the BlockedReason, result.description has a message
  console.warn(result.type, result.description);
} else {
  // result.status === 'failed'
  console.error(result.type, result.description);
}

...

vimOS.hub.pushNotification.hide();
Microphone badge
If your application needs to actively access the device's microphone, it is a best practice to inform users when your application is doing so. This helps maintain transparency, builds user trust, and supports privacy by ensuring users are aware when audio is being captured.
You can do this using the Vim Hub microphone badge function, which will show a visual microphone indicator on your application icon on the Vim Connect Hub.
vimOS.hub.microphoneBadge.show()will show the badge.vimOS.hub.microphoneBadge.hide()will hide the badge.
Example (GIF)
See here an example of what the badge looks like when your application is open and when it is closed: ![]()
Code example
ts
async function startListening() {
  try {
    // Show the microphone badge to indicate active listening
    vimOS.hub.microphoneBadge.show();

    // Request access to the user's microphone
    const stream = await navigator.mediaDevices.getUserMedia({ audio: true });

    // Do something with the audio stream (e.g., process audio, send to server, etc.)
    // For demonstration, we'll just stop after 5 seconds
    setTimeout(() => {
      // Stop all audio tracks to release the microphone
      stream.getTracks().forEach(track => track.stop());
      // Hide the microphone badge when done
      vimOS.hub.microphoneBadge.hide();
    }, 5000);
  } catch (err) {
    // Handle errors (e.g., user denied access, device not available)
    console.error('Microphone access error:', err);
    // Always hide the badge if not actively listening
    vimOS.hub.microphoneBadge.hide();
  }
}
Auto popup
Required permissions
WARNING
You must declare the autoPopup permission in the Developer Console to use this call.
vimOS.hub.autoPopup() → Promise<TriggerResult>
Allows you to automatically expand your application and the Vim Hub when there is no interaction with Vim in pop-up experience.
Returns a Promise that resolves with a TriggerResult so you can tell whether the request was sent, blocked (e.g. rate_limited, another_app_active), or failed. See TriggerResult type.
Code example
ts
const result = await vimOS.hub.autoPopup();

if (result.status === 'sent') {
  // Auto popup was triggered
} else if (result.status === 'blocked') {
  // result.type is the BlockedReason, result.description has a message
  console.warn(result.type, result.description);
} else {
  // result.status === 'failed'
  console.error(result.type, result.description);
}
INFO
Previously, autoPopup() threw a synchronous error when the app was not allowed by manifest. It now returns a Promise that resolves to { status: 'blocked', type: 'not_allowed_by_manifest', description: '...' }. If you used try/catch for capability errors, update your code to check the returned status (and type when status === 'blocked') instead.
Best practices
By automatically opening your application based on your specific application requirements, users can quickly access your application content without having to manually expand and explicitly open it, making the content immediately visible.
Important: We recommend to carefully use this function in general and if so in specific use cases to avoid to avoid impacting negatively the user experience. If you wish to maximize your application content exposure while keeping a positive user experience, we recommending using the push notification function in order to avoid alert fatigue.
limitations
TIP
Your application will auto popup only if:
- No other application is open in the Vim Hub.
- The clinic's organization doesn't have autoPopup disabled for the entire organization
- Your application did not yet ask today to auto popup for the patient currently in context
If your application is in DISABLED state when calling autoPopup, it will become enabled (see setActivationStatus).
Example (GIF)
See an example of an app that has set up the autoPopup function to be triggered when the encounter state is identified: 
TriggerResult type
TriggerResult is the object returned when your app asks the Hub to perform an action that may or may not be shown to the user. The Hub can accept the request (sent), refuse it due to rules or state (blocked), or report an error (failed). Checking the result lets you handle each case in your app instead of relying on thrown errors.
You get a TriggerResult whenever you call an API that "triggers" such an action. For example:
- Push notification — When you call
pushNotification.show(), the Hub may show the notification, block it (e.g. rate limit, same notification ID today, or another app open), or fail. The returnedTriggerResulttells you which happened. - Auto popup — When you call
autoPopup(), the Hub may open your app, block the request (e.g. another app is already open, or the organization has disabled auto popup), or fail. The returnedTriggerResulttells you which happened.
Both pushNotification.show() and autoPopup() return a Promise<TriggerResult>. Use the status and optional type and description fields to decide how to respond in your UI or logic.
ts
type TriggerResult =
  | { status: 'sent'; type: 'sent'; description: string }
  | { status: 'blocked'; type: BlockedReason; description: string }
  | { status: 'failed'; type: 'invalid_payload' | 'internal_error'; description: string };

type BlockedReason =
  | 'not_allowed_by_manifest'  // Capability not in app manifest
  | 'capability_disabled'       // Disabled by organization or user
  | 'rate_limited'             // Usage limit reached
  | 'app_not_ready'            // App disabled or not loaded
  | 'another_app_active'       // Another app is open
  | 'blocked_by_priority'      // Higher-priority action in progress
Close app
Vim automatically closes your app if it's open when users interact with Vim Hub (e.g., switching apps or closing the Hub). You can also proactively close your app using this function if needed for your use case.
Code example
ts
vimOS.hub.closeApp();Hub capabilities
vimOS.hub.capabilities is a read-only object that tells your app whether push notifications and auto popup are currently available, and why they might be disabled. Use it to avoid calling pushNotification.show() or autoPopup() when a capability is disabled, or to use other Hub UX features such as notification badges when a capability is unavailable.
ts
interface HubCapabilities {
  pushNotifications: {
    enabled: boolean;
    /** Present only when enabled is false; explains why the capability is disabled */
    reason?: CapabilityDisabledReason;
  };
  autoPopup: {
    enabled: boolean;
    /** Present only when enabled is false; explains why the capability is disabled */
    reason?: CapabilityDisabledReason;
  };
}

/**
 * - `capability_disabled`: The organization or user has disabled this capability for the app.
 * - `not_allowed_by_manifest`: The app manifest does not declare the required UI capability in the Developer Console.
 */
type CapabilityDisabledReason = 'capability_disabled' | 'not_allowed_by_manifest';
Code example
ts
if (vimOS.hub.capabilities.pushNotifications.enabled) {
  const result = await vimOS.hub.pushNotification.show({ ... });
} else {
  const reason = vimOS.hub.capabilities.pushNotifications.reason;
  // e.g. show in-app message: "Push notifications are disabled for this practice"
}

if (vimOS.hub.capabilities.autoPopup.enabled) {
  await vimOS.hub.autoPopup();
}
Best practices
Checking capabilities before calling pushNotification.show() or autoPopup() avoids unnecessary requests and lets you tailor UX when a capability is disabled (e.g. explain that the practice has disabled the feature or that the app must declare the permission in the Developer Console).
App state
vimOS.hub.appState holds information about the current state of your application in the Vim Hub.
Is app Open
vimOS.hub.appState.isAppOpen indicates whether or not your application is currently opened in the Vim Hub.
Subscribe to changes
You can receive notifications for changes in your app's open and close state: vimOS.hub.appState.subscribe('appOpenStatus', callback).
Your callback function will be called with the new openState; when the state changes between open and close, your callback will also receive the trigger of the status change:
ts
interface AppOpenStatus {
  isAppOpen: boolean;
  /*
   * What triggered an app open.
   * - `manually`: The user opened on your app in the Hub.
   * - `auto_popup`: Your application code called the `autoPopup` api.
   * - `push_notification_clicked`: The user clicked on your app's push notification.
   */
  appOpenTrigger?: 'manually' | 'auto_popup' | 'push_notification_clicked';
  /*
   * What triggered an app close.
   * - `manually`: The user clicked either the close icon on the Vim Hub header or the heart icon, which resulted in closing both the Vim Hub and your application.
   * - `app_switch`: Another app was opened; Since only one app can be open at a time, opening another app will cause your app to close.
   * - `app_disabled`: The app status was changed to DISABLED while the app was in an open state. As a result, the app was closed and disabled.
   * - `app_request`: The code triggered the closeApp function exposed by the sdk.
   */
  appCloseTrigger?: 'manually' | 'app_switch' | 'app_disabled' | 'app_request';
};